
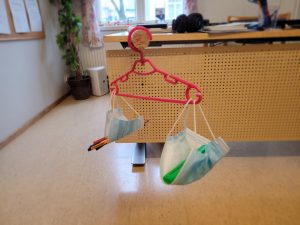
Explore together concepts such as heavy and light, or heavier and lighter, using (unused) face masks.
Ok. You’ll need a clothes hanger too. And the face masks can be replaced with two equal-sized cans with handles if you want.
Hang one face mask on each end of the hanger. Be careful that they hang the same distance from the middle to get an accurate scale.
 Then you can start compare different things. You can start by letting the children feel each hand and guess which one is heavier. First perhaps with things that have a little more difference, a raisin and an apple then you can try things closer together.
For a bigger challenge, swap the clothes hanger for a stick and work together to get the empty scale balanced first.
Category: English
Grow Your Socks
What you’ll need
- old pair of cotton socks
- plastic bags
- water
- tape
 What to do
Instead of putting seeds into the bag, running around in socks is how they’ll collect the seeds – directly from nature. Depending on your location and where you want to do your “collecting,” you can decide whether to let the kids just wear socks or whether you want to put the socks over their shoes. If you’re just running around your yard or neighborhood, I suggest the former. If you want to take a long hike, I’d suggest the latter. Both are pretty fun for kids!
Start by having the kids put on a pair of old socks (on their feet or over shoes). Next, since you want the seeds to stick, get the socks wet. Have the kids step in a bucket of water or just spray their feet with the hose. Once their socks are wet, set the kids loose!
Encourage them to explore wooded areas, under trees and bushes and other low traffic areas. Make sure they squish their feet into the ground to pick up as many seeds as possible. Step on dandelions, shuffle through fallen leaves, walk gently through the garden. Finally, have them find a muddy area to squish their feet in! This will pick up a bit of dirt to help the seeds grow.
When the socks are nice and filthy, take them off and place each one in a plastic bag. Tape the plastic bag to a window that gets a good amount of daily sunlight. If the socks feel dry, add a small amount of water. Now all you have to do is wait!
When they’ll sprout
Within a few days, you should notice some sprouting. By two weeks, your socks should have some serious blooms.
If at first you don’t succeed, try it again.
Grow your socks
Growing your socks is such a fun and easy science project for kids. It teaches them all about germination and what plants need to grow. You can experiment by growing socks from various locations to see the differences in the types of plants you get. If you want to go a step further, try identifying the sprouts you’re growing and figure out what each plant will look like when fully grown.
Is the Egg Raw or Cooked?
That is the Question!
Introduction
Have you ever found an egg in your refrigerator and wondered if it was cooked? Although eggs drastically change inside their shells when cooked, it is still remarkably difficult to distinguish a cooked egg from a raw one without cracking it open. In this activity, you will find out how physics can help you tell the difference!
Materials
- At least six chicken eggs similar in size and color
- Sauce pan
- Stove (Use caution and ask an adult to help you use the stove and handle hot items in this activity.)
- Water
- Timer
- Slotted spoon
- Pencil
- Two small plates
- Sheet of paper
Prep Work
- Place three eggs in the saucepan. Add enough water so there is half an inch covering the eggs. Put the saucepan on the stove.
- Heat the water until it comes to a rapid boil and keep it boiling for seven minutes.
How do you think the eggs are changing during this time? - Turn off the heat.
- Use the slotted spoon to take one egg at a time out of the hot water, rinse it under running cold water (optional), and store it in a safe place where it can cool completely.
- Use a pencil to make a small mark on the three raw eggs. Keep the mark subtle, as this will make it easier to test your ideas in an unbiased way.
- Store the raw eggs together with the cooked ones. This ensures that all eggs are at the same temperature when you start experimenting.
Procedure
- Choose a raw egg and crack it open on a plate.
How does the content of the raw egg look? - Repeat the first step with a cooked egg.
How does the content of a cooked egg differ from that of a raw egg?
The goal of this activity is to find a test that can identify whether an egg is cooked or raw without cracking the shell.
What are your ideas?
- Choose one cooked and one raw egg from the four uncracked eggs that are left. Put the other pair of eggs aside for now.
- If you find a difference, note it on your sheet of paper. Remember there is a mark on the raw egg. This will help you identify which type shows a particular characteristic.
- Look at the eggs, smell them, and weigh them in your hands.
Does one look different, smell different, or seem heavier than the other?
- Gently tap your pencil against the cooked and raw egg and listen.
Can you hear a difference? - Shake the eggs one at a time close to your ear.
Can you hear which one is raw? - Put one egg on its tip and spin it. Lay it flat and spin it. Try it a few times before switching to the other egg.
Does one spin more easily than the other? - Perform any other test or look for any other distinguishing characteristics you can think of.
- Review your notes.
Did you find differences? If so, do you think this difference appears because one of the eggs is cooked and the other is not? Why or why not? - If you found one or several differences between the raw and cooked egg, test if these differences also appear in your last pair of eggs. Try not to look at the little mark on the raw egg while doing the test.
Does this difference distinguish the raw from the cooked egg in this pair, too? If you found a difference that held up for both pairs, do you think it can differentiate all cooked eggs from raw eggs? Why do you think the differences occur?
What Happened?
Did you notice that the inside of a raw egg is liquid, while the inside of a cooked egg is solid? It was probably impossible to tell the difference without cracking the shell until you tried to spin the egg. Even though it is difficult to spin a cooked egg, spinning a raw egg was probably much harder. This is expected.
When you boil an egg, the inside becomes solid. It does not change how the egg looks or its odor, so you cannot see or smell the difference. Shaking a raw egg does not make a sloshing sound because the liquid in the egg is contained in a membrane and only a small air bubble is present. Neither egg is hollow, so tapping it does not produce a clear audible difference.
You can tell the difference between a cooked and a raw egg by spinning it: a cooked egg is easier to spin. As the inside of a cooked egg is solid, the particles inside cannot move around relative to each other or the shell. The whole egg moves in unison. When you spin the cooked egg by twisting its shell, the hole inside moves along with the shell. In a raw egg, the inside is still liquid. The particles that make up the liquid can slide and move around relative to each other and the shell. When you spin the shell of the raw egg, the liquid inside does not start spinning right away—it needs some time to “catch up,” and friction between the shell and the liquid slows down the spinning motion. Since it is easier to balance an egg on its tip by spinning it faster, this also makes cooked eggs easier to balance than raw eggs. It also helps that the inside of the cooked egg is less wobbly since it does not move around (its center of mass is fixed).
More, less, or just as much?
SUITABLE PLACE:
At the table with access to sink and water. (Or out in the rain?)
MATERIAL
Two identical glasses for each child, a teaspoon of metal and preferably several small jugs of water, which the children themselves can pour out.
DESCRIPTION
 Before starting to explain briefly: “We will learn new words with the help of water in glasses- We will learn words like more, less and as much. You will get two glasses each a small jug of water. First you will fill your glass, so that there is the same amount of water in both- “When the children are done with this, we see if some children have the same amount, if some have less, etc.- By using the teaspoon we can hear if there is the same amount of water in all the glasses – does it sound the same?
VARIATION
Feel free to do the same activity in other words, such as higher, lower and equally high.
Bears in a sofa
Task
Three bears should sit on a sofa. In how many different ways can it be solved?
Let the children document themselves on paper. The children can then be paired and compare their solutions.
End with a full class discussion. Discuss:
- What they came up with
- Different ways to document it
The task can be performed:
- Concrete: Find three figures and something that should be like a sofa and try to move around (or have three children sitting on three chairs)
- Semi-concrete: Draw a rectangle for the sofa and draw figures in it, or draw dots
- Abstract: Write letters for them in different order
To adapt the problem
- Two bears on a three-seater sofa
- Three bears on a two-seater sofa…
- More advanced: Increase the number of bears or sofa seats. Four bears on a three-seater sofa, or four on a four-seater sofa. But also four bears on a two-seater sofa!
A digital variant
A digital variant of the task is available in the CombiBears application. Teachers and students can now choose how many seats should be on the sofa and how many bears should sit there. After each completed combination, students can save their solutions by “taking cards” and finally comparing the cards systematically to see if they have found all the combinations or not.
Planting in the Window
When spring comes, it is always interesting to see things grow. Here are two different ideas that make it possible to see the whole process how roots are formed and shoots sprout.
I give two ideas to choose from:
1. CD planting
If you have some old CD cases left over (also comes with plastic pockets), you can try to put some soil in them, moisten it and then put in some seeds and see how it grows.
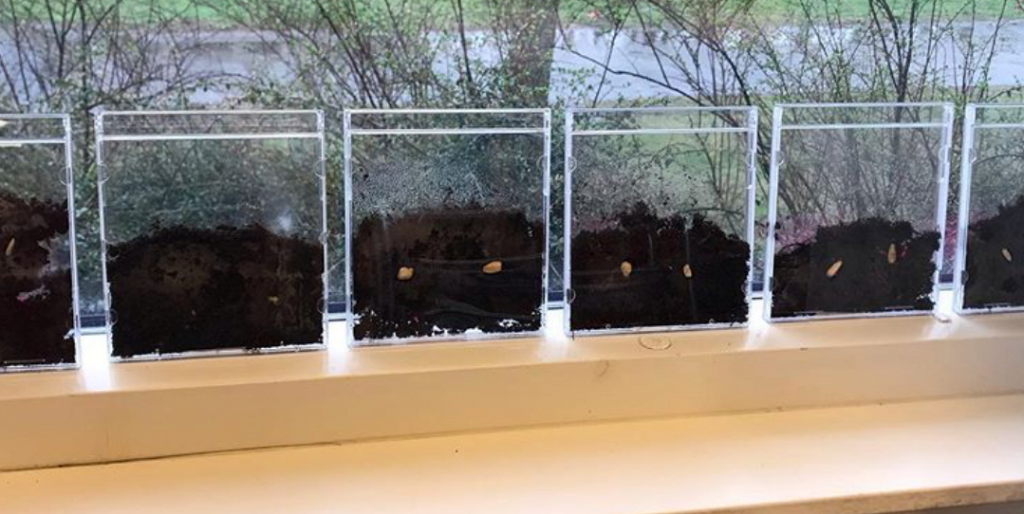
Idea from @JeanettesKlassrum on Instagram
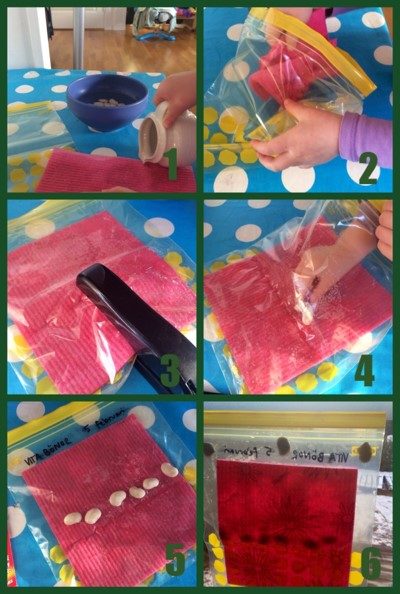
2. Grow in a plastic pocket
- Soak a cloth, washcloth or a few layers of kitchen paper and place in a bag.
- Staple the bag in the middle (so that the roots can fit downwards).
- Put some beans in the bag (in the proposal they had used, among other things, large white beans that were soaked overnight)
- Close the bag.
- Hang up in the window
You can try putting beans / seeds on both sides if you want to compare
If you take pictures daily can you follow the process of the sprouting.
Idea Förskoleburken
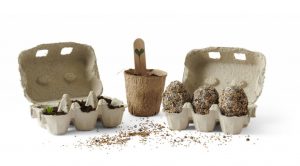
Seed-egg
Mix water into the pulp according to the instructions on the package. 6-8 eggs need 6 dl mass / 2 dl water.
Pour the seeds onto a paper plate. You can use any seeds.
Pour some soil (or sand) into the bottom of the egg carton and place the finished seed balls in it.
Take a small mass mix in your hands and shape it into an egg. Gently swirl the egg into the seed mixture. Put the egg in the box.
Lightly spray the seeds with water.
Place the cell in a sunny place and water the seeds gently daily. Soon the eggs will be delicious, edible greens!
Galaxy Painting
A galaxy is a huge collection of gas, dust, and billions of stars and their solar systems, all held together by gravity. The planet we live on, Earth is part of a solar system in the Milky Way galaxy. When you look up into the night sky, the stars you are looking at are all part of our galaxy.
Beyond our galaxy, there are many more galaxies that we cannot see with the naked eye. According to NASA, some scientists think there could be as many as one hundred billion galaxies in the universe.
Use your imagination and a few simple supplies to make a painting of the galaxy. Download our free printable art project and template below to get started!
SUPPLIES:
- White acrylic paint
- Watercolors
- Paintbrush
- Coarse salt
- Watercolor paper
INSTRUCTIONS
STEP 1: Drip several colors of watercolor paint onto watercolor art paper.
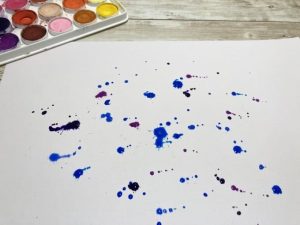
STEP 2: Spread the paint around with a large paintbrush. Repeat with more drips.
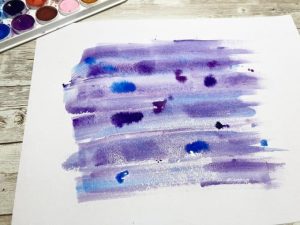
STEP 3: After the last set of drips, add a handful of course salt to the paint puddles and let dry.
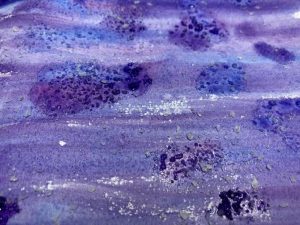
STEP 4: Now splatter a few drips of white paint on top of your
‘galaxy’ to add stars.

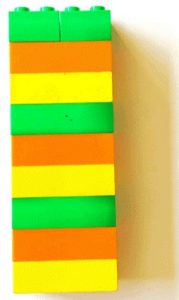
Patterns and pattern recognition with LEGO
Part of mathematics is patterns and pattern recognition.
An easy way to do that is to use LEGO.
- In the simplest variant, show the model, or a photo of a model and let the children build the same.
The simplest variant here is to just look at the shape, the next step is to have the right colors with.
(Also mention the colors and shapes to enhance the vision and hearing combination.) - It will be a little more difficult if you only tell what the model looks like. First you take a yellow piece and then…
The variant can be made for a child to tell as well. Or that the children sit back to back, one tells, the other builds and then they change. - If you then want to add another level, you can tell / show a basic structure and then say how many times it should be repeated.
This is where the programming idea of loops comes in.
Make a Horse that Walks
We made our horses out of construction paper. You can cut 2 or 3 out of one piece of paper.
Use a metric ruler to draw the shape below. Start with a rectangle that is 15 cm by 4.5 cm. Then divide it up as shown. Cut around the perimeter of the rectangle. Then cut the DOTTED LINES inside the rectangle.
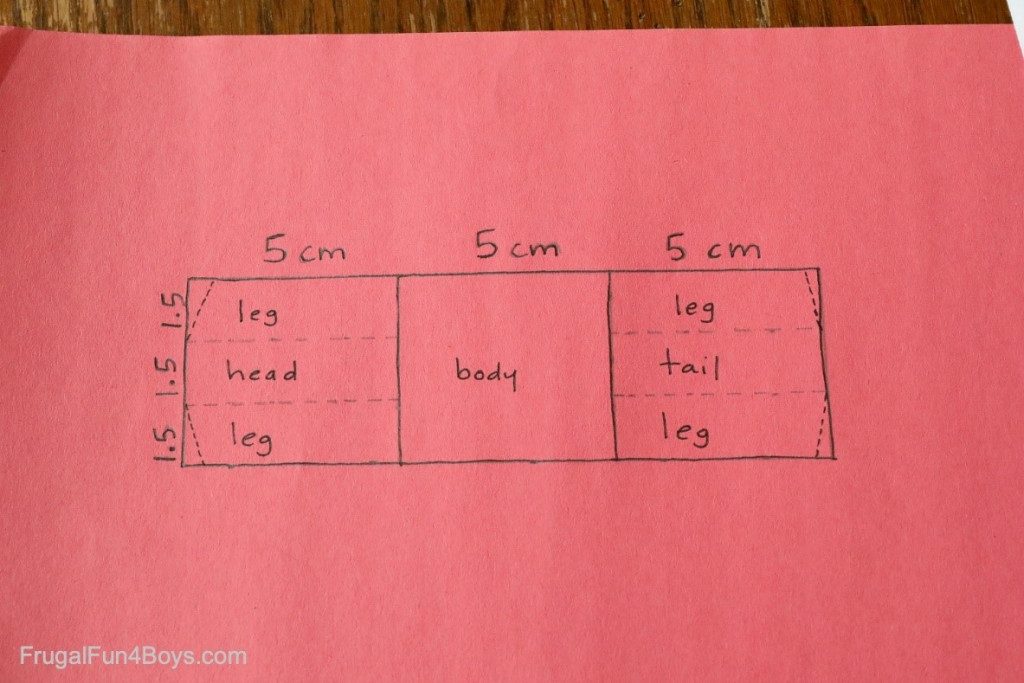 Cut out your horse as shown.
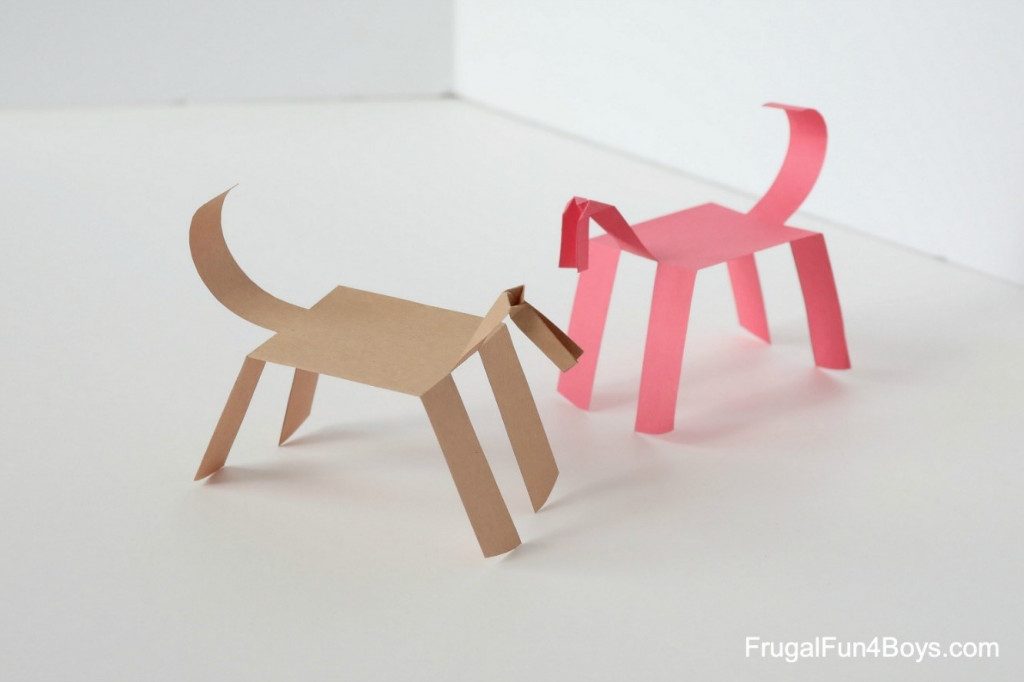
Curl the tail (I know horses tails aren’t curled like that, but it seems to make it balance better) and fold the head.
Now it’s time to make your horse walk!
Here’s how it works:
The paper horse walks by rocking back and forth on its curved feet. As the horse rocks from one foot to the other, gravity pulls the feet down the incline.
So it rocks to the right, and the left foot (which is no longer touching the board) moves forward. It rocks to the left, and the right foot moves forward. It’s pretty cool to watch!
Here’s a photo that shows the shape of the feet:
The surface that the horse walks on is important! It needs to have enough friction, but not too much.
So if it is not working try a slope with more friction, or less.
You can see our setup below. Your ramp doesn’t need to be this long!

Troubleshooting:
- If you can’t get your horse to walk, make sure that the legs are nice and straight.
- Try adjusting the height of the head. For whatever reason, our horse walked the best when his head was up high.
- Adjust the height of your slope. If the horse won’t walk, make it higher. If the horse tips forward, make it lower.
- If your horse is not rocking back and forth smoothly, try trimming the feet to make them rounded. They should work like rocking chair runners! The outside edge should be the highest point.