Ice Lantern

Supplies

  • Large plastic cup (like a Solo cup)
  • Small plastic cup
  • Decorative pieces (pompoms, beads, pipe cleaners, tinsel, pine needle, pine cones, dried berries, etc.)
  • Food coloring
  • Tape
  • Water
  • A freezer or it needs to be below zero outside
  • Battery operated candle (or tea light)

Directions

The first step is to decide on your decorations. This is the engineering challenge! We found it was best to take pipe cleaners and twist them so they spiraled up on the inside of the large cup. These acted as your garland and as a place to put all your other baubles so they stayed in place.

Now carefully place pompoms and beads so they balance on the garland. This can be challenging and they will move once you add water, so don’t stress too much.

Pro Tip! If you wish to be more environmentally conscious, natural materials like pine needles, small pine cones, dried berries and even small rocks or crystals all worked beautifully as well. The key is that they need to be small.

Once you are happy with your decorations slide the small cup inside the large cup. Tape it into place so the top of the cups are flush with each other.

Add a few drops of food coloring to the water.

Carefully start to add water between the two cups so the water only goes into the larger cup. You will need to add some weight to the smaller cup to keep it in place and stop it popping up. We added a couple of stones to ours to keep it in place.

Fill until the water is only a couple of centimeters from the top. This is important.

Finally, place the lanterns in the freezer (or outdoors) for 5 hours or until completely frozen.

Take A Moment For Science

Once it is frozen take a moment to look at your creation. You should notice that despite the tape and the weights the smaller cup is higher and the ice is to the top of the large cup. This is due to water expanding as it freezes. This is a fantastic opportunity to see this in practice and discuss what happens when water changes states.

Revealing the Lanterns

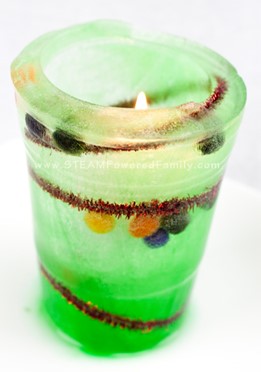
Now carefully remove the inside plastic cup, then the outer plastic up. You may need to cut the cups to get them off. Just carefully snip the edge with some scissors and you should be able to peel them off.

For safety you can use battery operated candles, plus they won’t melt your lantern like a tea light.

Turn on your candle, set it outside in the wintery cold and enjoy the beauty of your creation!

Tip from STEAMPoweredFamily.com

Islyktor

Material

  • Stor plastmugg
  • Liten plastmugg
  • Dekorativa bitar (pompoms, pärlor, piprensare, glitter, tallbarr, tallkottar, torkade bär etc.)
  • Hushållsfärg
  • Band
  • Vatten
  • En frys eller så måste den vara under noll ute
  • Batteridrivet ljus (eller värmeljus)

Instruktioner

Det första steget är att bestämma dina dekorationer. Vi tyckte att det var bäst att ta piprensare och vrida dem så att de snurrade upp på insidan av den stora koppen. Dessa fungerade som din krans och som en plats att sätta alla dina andra kulor så att de stannade på plats.

Placera nu försiktigt dekorationerna så att de balanserar på kransen. Detta kan vara utmanande och de kommer att röra sig när du tillsätter vatten, så stressa inte för mycket.

Proffstips!  Om du vill vara mer miljömedveten fungerar naturmaterial som tallbarr, små kottar, torkade bär och till och med små stenar eller kristaller också vackert. Nyckeln är att de måste vara små.

När du är nöjd med dina dekorationer skjuter du den lilla koppen inuti den stora koppen. Tejpa fast den på plats så att toppen av kopparna är i jämnhöjd med varandra.

Tillsätt några droppar hushållsfärg i vattnet.

Börja försiktigt att tillsätta vatten mellan de två kopparna så att vattnet bara går in i den större koppen. Du måste lägga till lite vikt i den mindre koppen för att hålla den på plats och förhindra att den dyker upp. Vi lade till ett par stenar i vår för att hålla den på plats.

Fyll tills vattnet bara är ett par centimeter från toppen. Det är viktigt.

Slutligen placera lyktorna i frysen (eller utomhus) i 5 timmar eller tills de är helt frysta.

Ta en stund med vetenskapen

När den är frusen, ta en stund att titta på din skapelse. Du bör märka att trots tejpen och vikterna är den mindre koppen högre och isen är högst upp på den stora koppen. Detta beror på att vatten expanderar när det fryser. Detta är ett fantastiskt tillfälle att se detta i praktiken och diskutera vad som händer när vatten byter tillstånd.

Få loss lyktorna

Ta nu försiktigt bort den inre plastkoppen och sedan den yttre plasten upp. Du kan behöva klippa kopparna för att få bort dem. Klipp bara försiktigt kanten med en sax så ska du kunna skala av dem.

För säkerhets skull kan du använda batteridrivna ljus, plus att de inte smälter din lykta som ett värmeljus.

Tänd ditt ljus, ställ ut det i den vintriga kylan och njut av skönheten i din skapelse!

Ide från STEAMPoweredFamily.com

Shapes around you

Look for different geometric shapes and record them with a video camera. The aim of the exercise is to observe the environment and think about the meaning of geometric shapes in the environment and in visual communication. This exercise will help you to integrate videography into your mathematics teaching.

Use a video camera to film different shapes (circle, triangle, square). Look for shapes made by humans, animals and natural forces.

Each object to be filmed is first shown in extreme close-up. The camera is then moved away from the object until it is fully visible. Film 10 different objects.

The group’s task can be to look for either similar shapes or as many different shapes as possible. The pictures can also be used as photo-references: When viewing, the teacher can pause the picture with the pause button when there is a close-up of the object in the picture. Students can guess which object it is. The teacher then starts the video and the object is revealed.

Idea taken from Kamerakynäpakka: Matematiikka (kamerakynapakka.blogspot.com)

Former runt omkring dig

Leta efter olika geometriska former och spela in dem med en videokamera. Syftet med övningen är att observera miljön och fundera över betydelsen av geometriska former i miljön och i visuell kommunikation. Den här övningen hjälper dig att integrera videofilmer i din matematikundervisning.

Använd en videokamera för att filma olika former (cirkel, triangel, kvadrat). Leta efter former som skapats av människor, djur och naturkrafter.

Varje föremål som ska filma visas först i extrem närbild. Kameran flyttas sedan bort från objektet tills det är helt synligt. Filma 10 olika objekt.

Gruppens uppgift kan vara att leta efter liknande former eller så många olika former som möjligt. Bilderna kan också användas som fotoreferenser: Vid visning kan läraren pausa bilden med pausknappen när föremålet på bilden är i närbild. Eleverna kan gissa vilket föremål det är. Läraren startar sedan videon och föremålet avslöjas.

Idén kommer från http://kamerakynapakka.blogspot.com/search/label/Matematiikka

How Strong is Spaghetti?

How strong is spaghetti?  Challenge kids to invent a way to find out!

Material

  • 1 package of spaghetti
  • 2 sheets of styrofoam
  • Books
  • Wooden blocks

We started our project by investigating how much weight spaghetti can hold when it’s vertical.  We quickly discovered that spaghetti is not very strong!  It bends very easily, and breaks easily.

I asked the boys if they thought multiple pieces of spaghetti could hold more weight, and possibly even hold up a book.  We tried sticking about 20 pieces of spaghetti into the styrofoam disk.

We decided to see if the spaghetti could hold up our large history book, and of course it could not…

We tried again with our test, and used LOTS of spaghetti.  I can’t remember how many pieces this was, but I think it was somewhere in the neighborhood of 200.  One of the challenges of balancing weight on top of spaghetti is that it bends and sways very easily!  We had good success putting another piece of styrofoam on top of the spaghetti, and then adding weight on top of that.

We were able to get 6 board books on top of the spaghetti!  Not a ton of weight, but hey – it’s spaghetti!

Then we devised a second test to investigate the strength of spaghetti when it is lying down horizontal.  Aidan built a small bridge out of blocks and laid the spaghetti across the bridge.  We were able to pull the spaghetti out of the styrofoam and use the same pieces.

Aidan put blocks on top of the spaghetti on each side to hold it in place.  Then he started adding weight in the middle.

Surprisingly, the spaghetti held a lot of weight!  I figured that it would be stronger this way than standing up vertically, but it was stronger than I thought it would be.

As Aidan added more weight to the center, he had to add more weight to the sides to keep the spaghetti in place.

What can we learn about the strength of materials from spaghetti?

This article from Scientific American explains what engineers are looking for when choosing the materials to design a bridge, and it has a neat experiment to test tension and compression in a bridge made out of spaghetti.  This is probably best for kids age 13+, but parents and teachers can also summarize the information for youngest students.  It’s not difficult to read, and I definitely learned something!

Challenge kids to invent their own way to test the strength of spaghetti!  Have fun investigating!

Thanks FrugalFun4Boys.com for the idea!

Hur stark är spaghetti?

Hur stark är spaghetti?  Utmana barnen att uppfinna ett sätt att ta reda på det!

Material

  • 1 paket spaghetti
  • 2 ark styrofoam
  • Böcker
  • Träklossar

Vi började vårt projekt med att undersöka hur mycket vikt spaghetti kan hålla när den är vertikal.  Vi upptäckte snabbt att spaghetti inte är särskilt stark!  Den böjer sig väldigt lätt och går lätt sönder.

Jag frågade pojkarna om de trodde att flera bitar spaghetti skulle kunna hålla mer vikt och kanske till och med hålla upp en bok.  Vi försökte sticka in ungefär 20 spaghettibitar i styrofoamskivan.

Vi bestämde oss för att se om spagettin kunde hålla upp vår stora historiebok, och det kunde den naturligtvis inte…

Vi försökte igen med vårt test och använde MASSOR av spaghetti.  Jag kommer inte ihåg hur många bitar det var, men jag tror att det var någonstans i närheten av 200.  En av utmaningarna med att balansera vikt ovanpå spaghetti är att den böjer sig och svänger väldigt lätt!  Vi lyckades bra med att lägga en annan styrofoambit ovanpå spaghettierna och sedan lägga vikt ovanpå den.

Vi lyckades få upp 6 brädböcker ovanpå spagettien!  Det var inte så mycket vikt, men det är ju spaghetti!

Sedan utarbetade vi ett andra test för att undersöka spaghettis styrka när den ligger horisontellt.  Aidan byggde en liten bro av klossar och lade spagettien över bron.  Vi kunde dra ut spagettin ur styroporet och använda samma bitar.

Aidan lade block ovanpå spagettien på varje sida för att hålla den på plats.  Sedan började han lägga till vikt i mitten.

Överraskande nog höll spagettien mycket vikt!  Jag tänkte att den skulle vara starkare på det här sättet än att stå vertikalt, men den var starkare än jag trodde att den skulle vara.

När Aidan lade till mer vikt i mitten var han tvungen att lägga till mer vikt på sidorna för att hålla spagettien på plats.

Vad kan vi lära oss om materialens styrka av spaghetti?

Den här artikeln från Scientific American (på engelska) förklarar vad ingenjörer letar efter när de väljer material för att konstruera en bro, och den innehåller ett snyggt experiment för att testa spänning och kompression i en bro gjord av spaghetti.  Detta är förmodligen bäst för barn från 13 år och uppåt, men föräldrar och lärare kan också sammanfatta informationen för de yngsta eleverna.  Den är inte svår att läsa och jag lärde mig definitivt något!

Utmana barnen att hitta på ett eget sätt att testa spaghettis hållfasthet!  Ha kul med att undersöka!


Tack FrugalFun4Boys.com för tipset!