Sky Science Experiment

Why The Sky Changes Color

Material

  • Smooth sided glass container or cup
  • Water
  • Milk
  • Flashlight
  • A dark room

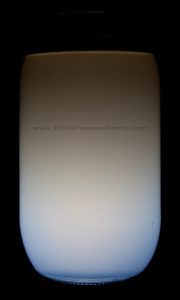
Start by filling your glass container with water, leave some room at the top. Add some milk and mix it in. We did a few different mixes to see how adding more or less milk affected the results. Play with the ratios, that’s the great thing about this experiment, seeing how it changes the results when we change the ratios.

Note: Whole milk works the best.

Now go into your dark room and hold the flashlight under the bottom of the glass.

Sky Colors

You will notice that close to the flashlight beam the liquid takes on a blue hue, but the farther you move through the liquid the more orange it appears. The orange should be especially evident if you look down into the glass while someone holds a flashlight on the bottom.

Play around with the position of the flashlight and how much milk you add to see how it changes the results. We had lots of subtle changes.

Holding the flashlight on the side brings the blues up the side of the glass with the orange on the other side.

Holding the flashlight at an angle at the bottom front creates another pattern, but always blue closest to the light and orange farther away.

This simple experiment demonstrates how particles in the air scatter light resulting in the beautiful colors we see in the sky.

Himmelskt experiment

Varför himlen ändrar färg

Material:

  • Glasbehållare med släta sidor
  • Vatten
  • Mjölk
  • Ficklampa
  • Ett mörkt rum

Genomförande

  • Fylla glasbehållaren med vatten, lämna lite utrymme högst upp.
  • Tillsätt lite mjölk och blanda i. Spela med förhållandena, det är det bästa med detta experiment, se hur det ändrar resultaten när vi ändrar förhållandena.

Obs: Helmjölk fungerar bäst.

Gå nu in i ett mörkt rum och håll ficklampan under glasets botten.

Himlens färger

Du kommer att märka att vätskan tar en blå nyans nära ficklampans stråle, men ju längre du rör dig genom vätskan desto mer orange ser den ut. Det orangea ska vara särskilt tydlig om du tittar ner i glaset medan någon håller en ficklampa vid botten.

Lek dig med ficklampans position och hur mycket mjölk du lägger till för att se hur den förändrar resultatet.

Om du håller ficklampan på sidan får du blå nyanser längs med ena sidan av glaset och orangea på andra sidan.

Att hålla ficklampan snett längst ner skapar ett annat mönster, men alltid blå närmast ljuset och orange längre bort.

Detta enkla experiment visar hur partiklar i luften sprider ljus och resulterar i de vackra färgerna vi ser på himlen.

Math-memory

The math memory works like a regular memory. Players take turns flipping two optional mugs. You should try to find a number that matches the number of pearls. If the mugs you have turned over do not form a pair, you turn the mugs upside down again. If the mugs are turned upside down in a pair, the player may take the mugs and count them as a pair.

What is the purpose of the game?
The purpose of math memory is to help children connect number (that which is abstract) with number of objects (that which is concrete). The game should help the children learn to recognize numbers and connect it with a concrete amount. Doverborg and Emanuelsson and Björklund  write about the concept of subitizing, which means that you can perceive numbers without counting. They believe that subitization is about an automated relationship between arithmetic words and some type of speech image. ”Subitisation is generally assumed to be the basis for arithmetic, because it presupposes an idea of ​​the relative size of quantities, that is, a sense of whether one quantity is greater or less than another.” 

The math memory helps the children to practice their ability to estimate numbers and it helps them to become better at number perception. The math memory consists of mugs that you have to turn over and it is important to pair the right number with the right number of beads. I have placed the beads as the dots are placed on a dice. The purpose is to make it easier for children to perceive the amount of pearls because the dots of the dice are placed in patterns that are easy to perceive.

How to make the game?
You can use disposable mugs where you stick beads or a piece of paper at the bottom of each mug. You can replace the beads with other objects, but it is important to remember to have the same type of object (for example buttons) so that the children are not confused. are different objects. When choosing mugs, keep in mind that it is important that the child has room to stick their fingers down and touch the beads. This is because many children want to touch the objects they are counting.

Matte-memory

Matte-memoryt fungerar som ett vanligt memory. Spelarna turas om att vända på två valfria muggar. Man ska försöka hitta en siffra som passar ihop med antalet pärlor. Bildar inte muggarna man vänt ett par vänder man muggarna upp och ner igen. Bildar muggarna man vänt upp ett par får spelaren ta muggarna och räkna det som ett par.

Vad är lekens syfte?
Matte-memory har som syfte är att hjälpa barnen att koppla ihop siffra (det som är abstrakt) med antal föremål (det som är konkret). Leken ska bidra till att barnen lär sig känna igen siffror och koppla samman det med en konkret mängd. Doverborg och Emanuelsson (2006a) och Björklund (2009) skriver om begreppet subitizing som innebär att man kan uppfatta antal utan att räkna. De menar att subitizering handlar om ett automatiserat förhållande mellan räkneord och någon typ av talbild. ”Subitisering antas allmänt ligga till grund för räknefärdigheten, eftersom den förutsätter en uppfattning om mängders relativa storlek, det vill säga en känsla för om en mängd är större eller mindre än en annan.” (Björklund, 2009, s. 62)

Matte-memoryt hjälper barnen att öva sin förmåga att uppskatta antal och det bidrar till att de blir bättre på antalsuppfattning. Matte-memoryt består av muggar som man ska vända på och det gäller att para ihop rätt siffra med rätt antal pärlor. Jag har placerat pärlorna som prickarna är placerade på en tärning. Syftet är att det ska bli lättare för barnen att uppfatta mängden pärlor eftersom tärningens prickar är placerade i mönster som är lätta att uppfatta.

Hur tillverkar man leken?
Man kan använda engångsmuggar där man klistrar fast pärlor eller ett papper  i botten av varje mugg Man kan byta ut pärlorna mot andra föremål men det är viktigt att tänka på att ha samma typ av föremål (exempelvis knappar) för att barnen inte förvirras av att det är olika föremål. När man väljer muggar ska man tänka på att det är viktigt att barnet får plats att sticka ner sina fingrar och röra vid pärlorna. Det på grund av att många barn vill röra vid föremålen som de räknar.

LEGO-stol för björn

Material som behövs

  • LEGO-tegelstenar
  • En uppstoppad björn eller leksak som kan sitta på rumpan
  • Linjal för att mäta björn / leksak (valfritt)
  • Papper och penna / markörer / kritor

Låt barnen titta runt i rummet och peka på alla stolarna i rummet. Vad märker de är detsamma med alla stolarna? Vad är skillnaden?

Be dem designa en stol för sin gosebjörn / leksak som kan ploppa ner i sittande ställning. Be dem tänka på sin björn när de utformar en stol. Vad behöver björnen sitta rätt? Vad behöver björnen för att känna sig bekväm? Hur ser du till att björnen passar i stolens stol?

  • Valfritt: Be dem först rita sin stol på ett papper.
  • Valfritt: Låt ditt barn mäta björnens ben, höfter och rygg så att de vet hur stor deras stol ska vara.

Låt sedan ditt barn börja bygga en stol av LEGO. Om du inte har LEGO hemma kan du använda hantverksmaterial som finns runt huset! Se till att berätta för ditt barn att stolen behöver vara robust och inte går sönder.

När de tror att de är färdiga med stolen, låt dem sitta björnen i den. De kan testa stolen så många gånger de vill med björnen.

Låt ditt barn reflektera över stolens framgång:

  • Fick björnen i stolen?
  • Stod björnen upprätt eller floppade över?
  • Såg björnen avslappnad eller rak ut?
  • dinglade björnbenen eller fanns det stöd för benen?


Då är det roligaste, dropptestet.

** Ta bilder och videor av stolen före dropptestet **

Låt en vuxen ta stolen och håll den i höfthöjd, släpp sedan stolen och se vad som händer med den. Om bitar flög av stolen, fråga ditt barn vad de kan göra för att göra stolen robustare!

Upprepa sedan alla steg så många gånger som behövs eller skapa en stol för alla gosedjur huset!

LEGO Chair for Bear

Materials needed:

  • LEGO bricks
  • A stuffed bear or toy that can sit on it’s bum
  • Ruler to measure bear/toy (optional)
  • Paper and pencil/markers/crayons

Have the children look around the room and point to all of the chairs in the room. What do they notice is the same about all of the chairs? What is the difference?

Ask them to design a chair for their favorite stuffed bear/toy that is able to plop down in a sitting position. Ask them to think about their bear as they design a chair. What does the bear need to sit up right? What does the bear need to feel comfortable? How do you make sure the bear will fit in the seat of the chair?

  • Optional: First ask them to draw out their chair design on a piece of paper.
  • Optional: Have your child measure the bears legs, hips, and back so they know how big their chair should be.

Then have your child start to build a chair out of LEGO. If you do not have LEGO at home, you can use craft materials found around the house! Make sure to tell your child the chair needs to be sturdy and not break easily.

When they think that they are done with the chair, have them sit their bear in it. They can test the chair as many times as they want with the bear.

Have your child reflect on the success of the chair:

  • Did the bear fit in the chair?
  • Did the bear stay upright or flop over?
  • Did the bear look relaxed or straight?
  • Did the bears legs dangle or was there support for the legs?

Then there is the most fun part, the drop test.

**Take photos and videos of the chair before the drop test**

Have an adult take the chair and hold it at hip length, then let go of the chair and see what happens to it. If pieces flew off the chair, ask your child what they could do to make the chair sturdier!

Then repeat all steps as many times as necessary or make a chair for every stuffed friend in the house!

Go fish

Materials: Deck of subitizing cards with quantities 0-10

How to Play:
• Deal each player 5 cards. The rest of the deck is then spread out
facedown to create a “fishpond” between the players.
• Before starting the game, all of the players put any pairs they
happen to have in their hand down and earn a point for each
pair.
• Each player gets a turn to ask another player if they have a
particular card. For example, on you turn, if you have a card with
five dots, you would ask your opponent if they also have a five
card. If they have a five, they give you the card. If they don’t have
a five, they say, “Go fish!” If you get a five from the pond, you put
the pair out in front of you. If you don’t get a five, you keep the
drawn card in your hand. Play continues until all the cards are
paired.
• Players get one point for each pair of cards. The player with the
most points wins the game.
• You can use chips or a ten frame to keep track of points. One chip
for each pair.


Variation:

  • One More Than– play with a deck of cards 0-9. Players ask for a
    card that is one more than a card in their hand. For example, if
    you have a three card in your hand, then you ask your opponent
    for a card with four.
  • Tens Go Fish – This game is just like regular Go Fish, but with a twist. Instead of matching pairs with the same numbers, match pairs whose sum is ten.

Gå och fiska!

Material:

  • Kort med prickar med talen 0-10


Hur man spelar:

  • Ge varje spelare 5 kort. Resten av däcket sprids sedan ut nedåt för att skapa en ”fiskdamm” mellan spelarna.
  • Innan spelet startar sätter alla spelarna de par de råkar ha i handen och får en poäng för varje par.
  • Varje spelare får i tur och ordning fråga en annan spelare om de har en särskilt kort. Till exempel när du vänder, om du har ett kort med fem punkter, skulle du fråga din motståndare om de också har en fem kort. Om de har fem, ger de dig kortet. Om de inte har det en fem, säger de, ”Gå och fiska!” Om du får en femma från dammen, sätter du paret framför dig. Om du inte får fem, behåller du draget kort i din hand. Spelet fortsätter tills alla kort är parade.
  • Spelare får en poäng för varje kortpar. Spelaren med flest poäng vinner spelet.
  • Du kan använda marker eller en tio bildrutor för att hålla reda på poäng. Ett chip för varje par.


Variant:

  • ”En-mer-än” – spela med en kortlek 0-9. Spelare ber om en kort som är ett mer än ett kort i deras hand. Till exempel om du har ett tre kort i handen, då frågar du din motståndare för ett kort med fyra.
  • Tio-par gå och fiska” – Detta spel är precis som vanlig Gå och fiska, men med en twist. Istället för matchande par med samma nummer, matchar par vars summa är tio.

Water Evaporation Experiment

What you need:

  • Find lids from various containers. Try to find lids of various sizes, some deep lids, bottle caps, and low lids like one from a play dough canister.
  • Other materials to see if you can adjust the lids that are alike.
  • Tape

How to do it:

Fill each lid with the same amount of water.  For example, 10 ml.

You can modify containers slightly to see how the top will affect rate of evaporation. You can cover with foil. Or cover and then poke small holes. Or cover with mesh. Or…

Ask the children what they think on from which lid they think water will evaporate more quickly.

Then just wait for the result.

If you like make a stop-motion or time lapse movie to capture the process.

Vattenavdunstningsexperiment

Material

  • Hitta lock från olika behållare. Försök hitta lock i olika storlekar, några djupa lock, flasklock och låga lock som en från leklera.
  • Andra material för att kunna justera lock som är likadana.
  • Tejp

Genomförande

Fyll varje lock med samma mängd vatten. Till exempel 10 ml.

Du kan ändra behållarna något för att se hur toppen kommer att påverka avdunstningshastigheten. Du kan täcka med folie. Eller täck och stick sedan små hål. Eller täck med nät. Eller…

Fråga barnen vad de tror om från vilket lock de tror att vattnet kommer att avdunsta snabbare.

Sen vänta bara på resultatet.

Om du har lust gör en stop-motion eller tidsfördröjningsfilm för att fånga processen.