Try to work together and build a tower. It’s understanind of mechanics and demands a whole lot of cooperation.
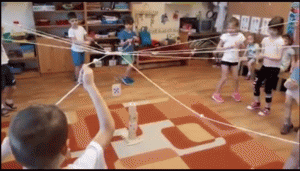 See link for a clip on how it works: Link
Mötespunkt för pedagoger att dela naturvetenskapliga idéer

Try to work together and build a tower. It’s understanind of mechanics and demands a whole lot of cooperation.
See link for a clip on how it works: Link
Pröva att bygga ett torn tillsammans. Det är mekanik tillsammans med en hel del samarbete!
Se länk för en film hur det fungerar: Länk
 Common Sense Education har många färdiga listor med appar och siter med information inom många olika delar av matematik och naturvetenskap. Går att söka på ålder, ämne, mm. Förstås är mesta av resurserna på engelska, med det finns med appar som finns tillgängliga på svenska. Några av dem kommer att komma upp inom kort på min andra blog: IKT-pedagogik.
 På Skolresurs.fi hittar du ett resurscenter för matematik, naturvetenskap och teknik i skolan. Deras materialbank är mestadels för skolan, men det finns en del intressanta länkar inom ämnet.
Länk: Skolresurs.fi
“Här hittar du tips till din NO-, matte- och teknik-undervisning.”
“Redan under min första termin som lärare på låg och mellanstadiet slogs jag av hur lite undervisning som bedrevs i vissa av NO-ämnena. Speciellt osynliga var fysiken och kemin. Eftersom jag var intresserad av dessa ämnen började jag tidigt med att försöka hitta former för en konkret och kreativ NO-undervisning i grundskolans tidigare år. Mycket kom det att handla om att utveckla enkla tankeväckande experiment med enkel utrustning.”
Länk: http://hanper.se/
 Sollentuna kommun har en sida för naturvetenskap och teknik sorterat under de fyra elementen: jord, luft, vatten och eld. Dessutom för bygg och konstruktion.
Under de olika experimenten finns fakta, experiment, boktips och sånger.
Länk: https://sites.google.com/a/edu.sollentuna.se/no—teknik-i-foerskolan/home
Vill du ha ett bildspel som underlag för ett tema kring vatten?
Här finns en presentation som kan fungera som bas för det. I presentationen varvas information, saker att fundera på och idéer till experiment.
För att kunna ladda ner det krävs det att du har konto hos lektion.se, det är dock gratis att skaffa.
Taken from Bodil Johansson ‘s blog
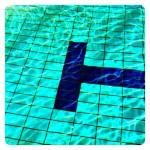

Have you thought on that the selection at the end of a swimming pool looks like a T or that a round pot from above becomes an O or that from a certain angle the cycle path marking becomes a Q? All you need is to look closer, change directions and suddenly you see the letter.
This is an exercise that is about learning to see the motives and how you, by thinking about the image composition, that is, how the different parts of the picture are connected, bring out the message of the image.
In addition to training in recognizing and naming letters, it can be an introduction to photography that will then give inspiration to more.
Taget från Bodil Johanssons blog
Har du tänkt på att markeringen i slutet på en simbassäng ser ut som ett T eller att en rund kruka ovanifrån blir ett O eller att från en bestämd vinkel blir cykelvägsmarkeringen ett Q? Allt du behöver är att titta närmare, byta håll och helt plötsligt ser du bokstaven.
Detta är en övning som handlar om att lära sig se motiven och hur du genom att fundera på bildkompositionen, det vill säga hur de olika delarna av bilden hänger ihop, få fram bildens budskap. Förrutom träning i att känna igen och namnge bokstäver kan det vara en introduktion till fotografering som sedan ska ge inspiration till mer.

For best results, the temperature should preferably be below or below 6 degrees Celsius. It is possible to freeze bubbles even in milder weather, but it is more difficult and takes longer.
It is also best to perform the experiment when it is windless so that the bubbles do not burst or blow away before they land and can freeze.
How to Shoot the Bubbles: