Klädnypeflygplan

Klädnypeflygplan men hjärformat meddelande fastklämt.

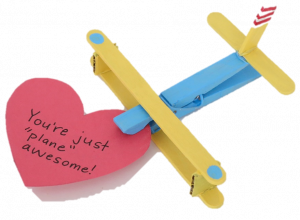
Använd klädnypan för att hålla fast ett litet pappershjärta med ett meddelande.
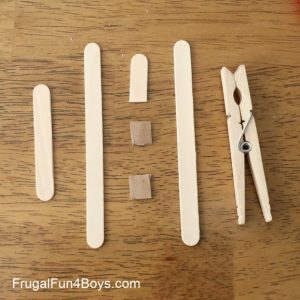
Material

  • Klädnypor – den typ som öppnas med en fjäder.
  • Glasspinnar – 2 per plan
  • Mini-glasspinnar – 2 per platta
  • Wellpapp
  • Lim – vi använde smältlim
  • Akrylfärg och penslar
  • Saxar
  • Byggnadspapper
  • (Magnet)

Steg 1: Sätt ihop delarna.

För varje plan behöver du två glasspinnar, en klädnypa och en mini-glasspinne.

Skär ut kartongdelar för stöttorna mellan vingarna på biplanet. Gör kartongsegmenten precis tillräckligt höga för att den övre vingen ska sitta Ovanför klädnyckeln och inte fästas vid den. På så sätt kan du fortfarande använda klädnypan för att sätta in pappershjärtat.

Skär ett segment av en glasspinne för att få en svans. OBS – på fotot är glasspinnen klippt rakt över, men om du klipper svansen i en vinkel ser det bättre ut.

De delar man behöver för att tillverka flygplanet.

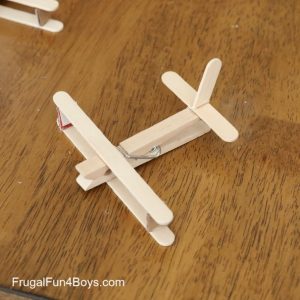
Steg 2: Sätt ihop planet med hjälp av smältlim.

Vi fann att det var lättare att limma ihop planet först innan vi målade. På så sätt kan du täcka eventuella slarviga limområden med färg.

*Limma inte fast glasspinnen på toppen av klädnypan, annars kan den inte öppnas. Limma fast den på kartongstöden.

Färdigmonterat flygplan.

Steg 3: Måla ditt flygplan!

Steg 4: Klipp ut ett hjärta av byggpapper och skriv ett trevligt budskap!

Dessutom en annan idé – det kan vara roligt att sätta en magnet på planets mage och sätta den på kylskåpet!


Tack till FrugalFun4Boys för tipset!

Clothespin Airplane Valentines

Clothespin airplane with heart shaped message attached.

Use the clothespin to hold onto a little paper heart with a message.

Supplies Needed

  • Clothespins – the type the open with a spring
  • Popsicle sticks – 2 per plane
  • Mini popsicle sticks – 2 per plate
  • Corrugated cardboard
  • Glue – we used hot glue
  • Acrylic paint and brushes
  • Scissors
  • Construction paper
  • (Magnet)

Step 1: Assemble your pieces.

For each plane, you’ll need two popsicle sticks, one clothespin, and one mini popsicle stick.

Cut cardboard segments for the struts between the wings of the bi-plane. Make the cardboards segments just tall enough that the top wing will sit ABOVE the clothespin and not attached to it. That will allow you to still operate the clothespin to insert the paper heart.

Cut a segment of a popsicle stick to be a tail. NOTE – the photo shows the popsicle stick cut straight across, but if you cut the tail at an angle, it looks better.

Required part to build the airplane.

Step 2: Assemble the plane with hot glue.

We found that it was easier to glue the plane together first before painting. That way, you can cover any sloppy glue areas with paint.

*Don’t glue the popsicle stick wing to the top of the clothespin, or the clothespin won’t open. Glue it to the cardboard struts.

Assembled airplane.

Step 3: Paint your plane!

We used acrylic paint, and I really think that’s the best option. Just make sure to cover up clothes, etc. when working with acrylic because it won’t wash out.

Step 4: Cut out a heart from construction paper and write a cheerful message!

Also, another idea – it might be fun to add a magnet to the belly of the plane and put it on the refrigerator!


Thanks to FrugalFun4Boys for the idea!

Tin Can Phone

Tin can telephone.
By Chris Potter – flickr, CC BY 2.0, https://commons.wikimedia.org/w/index.php?curid=40558179

Material

  • 2 paper cups
  • Pin or pin
  • about 1.5m of string
  • 2 paper clips

Method

Use a pin to make a hole in the bottom of each mug.

Pull the string through the holes through both cups. Make sure the bottoms of the cups are facing each other.

Tie a paper clip at each end of the string

Pull the string so hard with your friend that the paper clips hit the bottom of the mugs.

Take turns talking into the mug and listening by placing the mug over your ear.

Why

The sound travels through the air in waves. When you speak, the mug picks up sound waves, after which they move the string along with your friend’s mug.

This can also be done when several mugs are connected by string. Make another landline phone out of two mugs and tie the phones together to get a landline phone for four.


Trådtelefon

Av Chris Potter - flickr, CC BY 2.0, https://commons.wikimedia.org/w/index.php?curid=40558179
Av Chris Potter – flickr, CC BY 2.0, https://commons.wikimedia.org/w/index.php?curid=40558179

Material

  • 2 pappersmuggar
  • stift eller kartnål
  • ungefär 1,5m snöre
  • 2 gem

Tillvägagångssätt

Använd ett stift för att göra ett hål i botten av varje mugg.

Dra snöret genom hålen genom båda muggarna. Se till att muggarnas botten kommer mot varandra.

Knyt ett gem i varje ände av snöret

Dra snöret så hårt med din vän att gemen träffar muggarnas botten.

Turas om att prata i muggen och lyssna genom att placera muggen över örat.

Varför

Ljudet rör sig genom luften i vågor. När du talar, tar muggen upp ljudvågor, varefter de flyttar strängen tillsammans med din kompis mugg.

Detta kan också göras när flera muggar är anslutna med snöre. Gör en annan trådtelefon av två muggar och knyt ihop telefonerna för att få en trådtelefon för fyra.