Släck ljuset

Trixa med julljusen.

Material

  • ljus
  • tändstickor
  • kanna,
  • ättika
  • bikarbonat (bakningssoda)

Genomförande

  • Steg 1: Tänd ljuset.  Häll några deciliter ättika i kannan.
  • Steg 2: Sätt några teskedar bikarbonat och rör om.
  • Steg 3: Luta kannan försiktigt mot ljuset, utan att vätskan kommer ut.  Lyckas du släcka ljuset?

Vad hände?

Då du tillsätter sodan i ättikan händer det en kemisk reaktion. Reaktionen bildar vatten och koldioxid gas. Gasen är tyngre än luft och sjunker neråt. Vi kan inte se gasen, vilket får det att se magiskt ut. Då du lutar kannan mot ljuset kommer en del av gasen ut, eftersom gasen är tyngre än luft så trycker den ner luften och kväver lågan. Koldioxidgas är en produkt av förbränning, därför brinner inte koldioxidgas, utan klarar av att släcka ljuset. Andra gaser, liksom syre har en egenskap att få elden att leva. T.ex. då du blåser på en brasa så brinner den bättre för att du tillför syre i elden.
Luften innehåller 21% syre och den luft vi andas ut 16% syre.

Tips från Heurekas Experimentfabrik

Kill the Light

Play with the Christmas lights.

Material

  • candles
  • matches
  • pitcher,
  • vinegar
  • bicarbonate (baking soda)

Instructions

  • Step 1: Light the candle. Pour a few decilitres of vinegar into the jug.
  • Step 2: Add a few teaspoons of baking soda and stir.
  • Step 3: Gently tilt the jug towards the candle, without letting the liquid out. Do you manage to extinguish the candle?

What happened?

When you add the soda to the vinegar, a chemical reaction happens. The reaction forms water and carbon dioxide gas. The gas is heavier than air and sinks downwards. We can’t see the gas, which makes it look magical. When you tilt the jug towards the light, some of the gas comes out, because the gas is heavier than air it pushes the air down and smothers the flame. Carbon dioxide gas is a product of combustion, therefore carbon dioxide gas does not burn, but manages to extinguish the candle. Other gases, like oxygen, have a property of keeping the fire alive. For example, when you blow on a fire, it burns better because you add oxygen to the fire.

Air contains 21% oxygen and the air we breathe out contains 16% oxygen.

Idea from Heureka Experimentfabrik.

Hoppande fågel/Muggraket

Steg-1: Förbered några dekorativa saker till din raket

Bygg vingar, en raket eller vad du tycker är lämpligt av papp att dekorera raketen med.

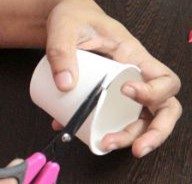
Steg-2: Förbereda raket

Vi behöver en stark raket, så jag kommer att lägga upp den med en kopp till.

Klipp bara av kanten på koppen och sätt in den i en annan kopp för att göra två lager.

Ta en pappersmugg och sätt två hål genom att föra in en nål med en spets på muggens sida mot den motsatta sidan av koppen. Så att de två hålen förblir helt motsatta varandra.

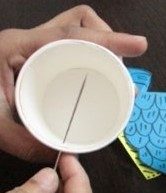
Se till att du håller dessa hål nära kanten på pappersmuggens mynning. Upprepa samma process för att göra hål på andra sidan av koppen. Det betyder att du gör fyra hål på de fyra sidorna av pappersmuggen.

Steg-3: Sätta i gummiband

Välj två gummiband och klipp av dem på ett ställe. Sätt sedan in gummibandet i två valfria hål på motsatta sidor av koppen och knyt dess änddel för att hålla en knut i båda ändarna. Så att det insatta bandet inte glider ut ur hålen.

Upprepa samma sak med den andra bandraden och håll täta knutar i den andra uppsättningen hål runt koppen. Slutligen, efter att ha knutit band till hålen på koppen, kan du se plusformen på den öppna sidan av pappersmuggens överkant.

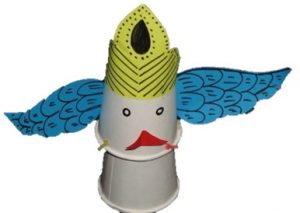
Steg-4: Limma fast de dekorativa grejerna

Det är dags att dekorera vår raket! Håll pappersmuggen, dvs raketdelen, upp och ner. Och limma fast de dekorativa sakerna, dvs vingar och krona, på samma kopp.

Steg-6: Flygande pappersmuggsraket

I det här steget väljer du en annan pappersmugg och placerar den i omvänt läge så att pappersmuggen är i uppochnedvänt läge. Vi kommer att använda denna omvända pappersmugg som basdel eller bärraket för din rymdraket.

Placera nu din raket ovanpå baskoppen men upp och ner. Se till att basen också är i omvänt läge. Ge sedan ett lätt tryck bara med fingertopparna och tryck raketen mot basen. Efter att ha tryckt den över basdelen, släpp trycket på raketdelen.

Vetenskapen bakom hur pappersmuggsraketen flyger

Vad säger Newtons tredje rörelselag? Det står; ”Varje handling har en likvärdig och motsatt reaktion”. Den uppfyller newtons tredje lag, raketdelen, när du trycker nedåt över basdelen och släpper, den flyger upp i luften. Det betyder att mängden tryck du ger på raketen gör att den flyger med samma mängd energi och kraft uppåt efter att ha släppt trycket.

Idén är hämtad från GoScienceGirls-bloggen

Jumping Bird/Cup rocket

Step-1: Prepare some decorative stuff for your Rocket

Construct wings, a rocket or what you think is suitable out of construction paper to decorate the rocket with

Step-2: Preparing Rocket

We need a strong rocket, so I am going to layer it up with another cup.

Just cut the edge of the cup and insert it in another cup to make two layers.

Take a paper cup and put two holes by inserting a needle one point of the cups side to the opposite side of the cup. Such that the two holes remain quite opposite to each other.

Make sure you are keeping these holes near the brim of the paper cup mouth area. Repeat the same process of making hole on the other side of the cup. That means you are making four holes on the four sides of the paper cup.

Step-3: Inserting Bands

Pick two rubber bands and cut them at one point. Then, insert the line of rubber band into any two holes in opposite sides of the cup and tie its end part to keep a knot on both ends. Such that the inserted band will not slip out of the holes.

Repeat the same with the other line of band and keep tight knots into the other set of holes around the cup. Finally, after tying bands to the holes of the cup, you can see plus shape at the open side of paper cup mouth brim.

Step-4: Glue the Decorative Stuff

It is time to decorate our rocket launcher! Keep the paper cup which is referring to the rocket part, upside down.

Step-6: Flying Paper Cup Rocket

In this step, pick another paper cup and place it in reverse position such that the paper cup is in upside position. We are going to use this inverse paper cup as a base part or launcher for your space rocket.

Now place your rocket on top of the base cup but in upside down position. Make sure the base is also in inverse position. Then, give a gentle pressure just with the bear hands and push the rocket towards the base. After pushing it over the base part, release the pressure on the rocket part.

Science behind How Paper Cup Rocket Fly

What Newton’s Third Law of Motion says? It says; “every action has an equal and opposite reaction”. Satisfying the newton’s third law, the rocket part when you push downwards over the base part and release, it flies into the air. That means the amount of pressure you give on the rocket makes it fly with the same amount of energy and force upwards after releasing the pressure.

Idea taken from the GoScienceGirls-blog

Animal Statistics

Each student selects an animal and searches for information about it to compile an animal card:

Which animal?
Height:  
Mass:  
Tail length:  
Life span:  
Speed:  
Color:  
Conservation status:  

Examine together the different characteristics of the animals by standing in a line or in a queue in order of size according to a certain characteristic.

Survey questions

  • Height: Which of the animals is the tallest? Or the lowest?
  • Lifespan: Which of the animals can live the longest? What is the middle value among the life expectancies (so-called median)?
  • Speed: Which of the animals is the fastest? Or the slowest? What is the most common speed among animals (so-called typical value)?
  • Conservation status: What is the most common conservation status?

Extra

Carry out additional research based on frequencies:
categorise the animals according to their lifespan into categories 1-5 years, 6-10 years, 11-15 years, etc.
Examine the frequencies in the different categories.

Suggestion

  1. Produce pieces of paper in different colors on which you write the central concepts, such as median, type value, minimum value and maximum value. Hand out the notes next to the various survey questions to the right people to clarify the correct answer.
  2. You can also take pictures of the different trails you create, so that the examples can be visually examined afterwards as well.


Idea from Lumatikka’s material.

Ten Buddies

  • Create a circle on the floor and divide it in half into two parts – A and B. Ten children are allowed to move freely within the circle to the beat of the music. When the music is turned off, check how many children are on the A side and how many are on the B side. That way you get two ten buddies!
  • Ten children stand on the A side of the circle. The teacher gives a number between 0 and 10. The children move so that x children go to the B-side. The children then count how many children were left on the A side. The result is a pair of ten buddies.

Idea from Lumatikka’s material.

Practicing Number Sequence Skills With Your Body

  • Half of the pupils stand in a line in the yard or in the gymnasium and create a series of different body positions.
  • The other half of the students continue the line by creating a new, similar series.
  • The task can be made more difficult by asking about the length of the series or by asking participants to create a series that has a certain length.

Idea from Lumatikka’s material.

Djurstatistik

Varje elev väljer ut ett djur och söker information om det för att sammanställa ett djurkort:

Vilket djur?
Höjd:  
Massa:  
Svanslängd:  
Livslängd:  
Snabbhet:  
Färg:  
Bevarandestatus:  


Undersök tillsammans djurens olika egenskaper genom att ställa er i ett led eller i en kö i storleksordning enligt en viss egenskap.

Undersökningsfrågor

  • Höjd: Vilket av djuren är högst? Eller lägst?
  • Livslängd: Vilket av djuren kan leva längst? Vilket är det mittersta värdet bland livslängderna (s.k. median)?
  • Snabbhet: Vilket av djuren är snabbast? Eller långsammast? Vilken hastighet är vanligast bland djuren (s.k. typvärde)?
  • Bevarandestatus: Vilken är den vanligaste bevarandestatusen?

Extra

Gör ytterligare undersökningar utifrån frekvenser:
Kategorisera djuren enligt livslängd i kategorierna 1–5 år, 6–10 år, 11–15 år osv.
Undersök frekvenserna i de olika kategorierna.

Förslag

  1. Ta fram lappar i olika färger som ni skriver de centrala begreppen på, till exempel median, typvärde, minsta värde och största värde. Dela ut lapparna vid de olika undersökningsfrågorna till rätt personer för att tydliggöra det rätta svaret.
  2. Ni kan också ta bilder av de olika leden ni skapar, så att exemplen kan undersökas visuellt också efteråt.


Idé från Lumatikkas material.

Tiokompisar

  • Skapa en cirkel på golvet och dela den mitt itu i två delar – A och B. Tio barn får fritt röra sig inom cirkeln i takt med musiken. När musiken stängs av ska man se efter hur många barn som står på A-sidan och hur många på B-sidan. På så sätt får man två tiokompisar!
  • Tio barn ställer sig på A-sidan av cirkeln. Läraren ger ett tal mellan 0 och 10. Barnen flyttar sig så att x barn går till B-sidan. Därefter räknar barnen hur många barn som blev kvar på A-sidan. Resultatet är ett tiokompispar.

Idé från Lumatikkas material

Öva talföljdsfärdigheter med kroppen

  • Hälften av eleverna ställer sig i ett led ute på gården eller i gymnastiksalen och skapar en serie av olika kroppsställningar.
  • Andra hälften av eleverna fortsätter ledet genom att skapa en ny, likadan serie.
  • Uppgiften kan göras svårare genom att fråga om längden på serien eller genom att be deltagarna att skapa en serie som har en viss längd.