Plant and water experiment

  1. Put some damp cotton wool in plastic bags (4 of them) and pour some Crassus seeds on top.
  2. Place on the window. When the plants have grown a little, start the experiment.
  3. Water the plastic bags with different types of water: one with salt water, one with sugar water, one with vinegar or lemon water and one with plain water. The one dipped in plain water is the control. You can put a frame around the plastic pocket.
  4. You can also compare how the cress reacts to boiled water, for example, or water with dishwashing liquid mixed in.
  5. Document, compare and discuss.

Experiment med växter och vatten

Instruktioner

  1. Lägg fuktig bomullsull i plastpåsar (4 stycken) och häll några krassefrön ovanpå.
  2. Placera i fönstret. När plantorna har vuxit lite kan du börja experimentet.
  3. Vattna plastpåsarna med olika typer av vatten: en med saltvatten, en med sockervatten, en med vinäger- eller citronvatten och en med vanligt vatten. Den som doppas i vanligt vatten är kontrollen. Du kan sätta en ram runt plastfickan.
  4. Du kan också jämföra hur krasse reagerar på till exempel kokt vatten eller vatten med diskmedel inblandat.
  5. Dokumentera, jämför och diskutera.

Picking flowers…but there aren’t any?

Idea from Hands-On Science

This is what you need:

  • Plastic bags
  • Household paper
  • Jars
  • Flower sprayer
  • Potting soil
  • Documentation
  • Pot
  • Drawing material
  • iPad
  • Stop-motion (app)

Time to collect leftovers from summer flowers. These are called winter standers and are old inflorescences that have dried and are still standing filled with flower seeds. Put the winter stands in bags.

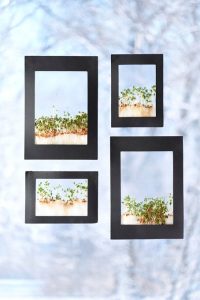
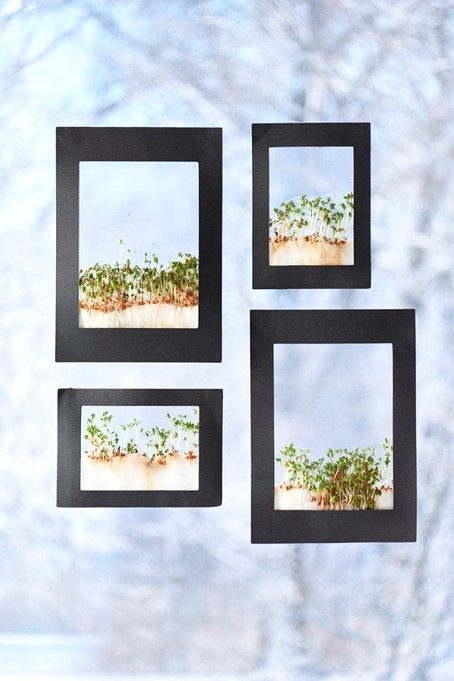
When you get to school/preschool, put the seeds on damp paper towels in different jars and keep the jars warm. For example, in a window with lots of sunlight. After a few days, some seeds will germinate. Then you will see the very first green leaves called heart leaves. Water with a flower sprayer. See how they grow day by day. After a few more days, carefully sprinkle some soil on the seedlings and plant them in a pot.

Continued

Option 1:

Rig a recording with an iPad and a stop-motion app that takes a picture of the plant once an hour for a couple of days, and you’ll get an absolutely stunning movie as a result!

Option 2:

What kind of flower will it be? Let the children imagine and draw the flower they think will grow from the seed. These can be beautiful, crazy and imaginative paintings that are perfect for an opening or theme party.

Option 3:

When the spring sun has warmed the ground and it is possible to dig in it. Plant your plants out in the wild again and mark the spot and follow the plant for a year. Document with analogue and digital tools.

Plocka blommor…men det finns ju inga?

Idé från Hands-On Science

Det här behöver du:

  • Plastpåsar
  • Hushållspapper
  • Burkar
  • Blomspruta
  • Blomjord
  • Dokumentationsmaterial
  • Kruka
  • Teckningsmaterial
  • iPad
  • Stop-motion (app)

Dags att samla rester från sommarens blommor. Dessa kallas vinterståndare och är gamla blomställningar som har torkat och fortfarande står kvar fyllda med blomfrön. Lägg vinterståndarna i påsar.

När ni kommer till skolan/förskolan kan ni lägga fröerna på fuktigt hushållspapper i olika burkar och ställa burkarna varmt. T.ex. i ett fönster med mycket solljus. Efter några dagar kommer några frön att gro. Då ser ni de allra första gröna bladen som kallas hjärtblad. Vattna med blomspruta. Se hur de växer dag för dag. Efter ytterligare någon dag strö försiktigt över lite jord på de späda plantorna och plantera i en kruka

Fortsättning

Alternativ 1:

Rigga en inspelning med en iPad och en stop-motion app som tar bild på växten en gång i timmen under ett par dygn, så kommer ni få en helt fantastisk film som resultat!

Alternativ 2:

Vad blir det för blomma? Låt barnen fantisera och rita av den blomma de tror ska växa ur fröet. Det kan bli fina, galna och fantasieggande målningar som passar bra till en vernissage eller temaavslut.

Alternativ 3:

När vårsolen värmt upp marken och det går att gräva i den. Plantera era plantor ute i naturen igen och markera platsen och följ plantan under ett år. Dokumentera med analoga och digitala verktyg.

Worm in the Box

How to play?

The worm in the box exercises the ability to divide numbers. The game starts with the teacher and the children investigating how many beads make up the worm’s body. Count the beads in different ways, both backwards and forwards. The teacher takes out the matchbox and tells them that this is the worm’s house. It is important to draw the children’s attention to the number on the house and link it to the number of beads on the worm.  The teacher explains and demonstrates that the worm crawls into the house and hides and then the house closes. Ask the children: how many beads of the worm’s body are inside the house? How do you know? How many are outside the house? Open the house and see how many there are.

What is the purpose of the game?

The purpose of the worm in the box is to practice the ability to divide numbers. It is a concrete and clear way to make addition and subtraction visible to the children. In order to understand the relationship between parts and whole, it is important that the whole is discernible. The worm in the box helps children to practise the ability to automate the division of numbers.

How to make the game?

I have used small matchboxes which I have lined with coloured paper with a number on it. This becomes the worm’s house. I made the worm itself by stringing beads on a thread and tying the ends of the thread. How many beads you need depends on the number you want to practice with the children. My suggestion is to make nine worms with corresponding houses, with numbers two to ten to practice different numbers.

The idea is taken from Mattelekar i förskolan

Masken i asken

Hur leker man?

Masken i asken övar upp förmågan att dela upp tal. Leken börjar att pedagogen tillsammans med barnen undersöka hur många pärlor maskens kropp består av. Räkna pärlorna på olika sätt, både framlänges och baklänges. Pedagogen tar fram tändsticksasken och berättar att detta är maskens hus. Det är viktigt att göra barnen uppmärksamma på siffran på huset och koppla ihop den med antalet pärlor på masken.  Pedagogen berättar och visar att masken kryper in i huset och gömmer sig och så stängs huset. Ställ frågor till barnen: Hur många pärlor av maskens kropp är inne i huset? Hur vet man det? Hur många är utanför huset? Öppna huset och titta hur många det är.

Vilken är lekens syfte?

Syftet med masken i asken är att öva upp förmågan att dela upp tal. Det är ett konkret och tydligt sätt att synliggöra addition och subtraktion för barnen. För att förstå relationen mellan delar och helhet är det viktigt att helheten är möjlig att urskilja. Masken i asken hjälper barnen att öva upp förmågan att automatisera hur man kan dela upp tal.

Hur tillverkar man leken?

Jag har använt mig av små tändsticksaskar som jag har klätt med färgat papper med en siffra på. Detta blir maskens hus. Själva masken gjorde jag genom att trä pärlor på en tråd och knyta ändarna på tråden. Hur många pärlor man ska beror på vilket tal man vill öva med barnen. Mitt tips är att göra nio maskar med tillhörande hus, med talen två till tio för att kunna öva olika tal.

Idén hämtad från Mattelekar i förskolan

Newspaper fort

Take two sheets of newspaper, lay them out flat and start rolling it from one corner. The tighter the roll the more support you’ll have. My boys aren’t tight rolling masters yet but they did pretty well for their first time!

Secure the end with a small piece of tape. An ideal amount would be around 48 but it can be enough with less. Next, you’ll be making triangles with your newspaper rolls. Tape or staple the ends together to form a triangle.

Create as many triangles as you can with your newspaper rolls. Finally, you’ll secure each triangle to each other creating whatever size structure you want!

Your structure size will depend on how many triangles you made. Just make sure you have enough for the roof which will provide the final stability for your fort.  You can secure the “joints” with some extra staples or tape to be sure it doesn’t move around too much.

The rest is up to your imagination! The structure should even be sturdy enough for a blanket on top!

The idea is taken from https://modernparentsmessykids.com/play/

Tidningsfort

Ta två ark tidningspapper, lägg dem platt och börja rulla ihop dem från ett hörn. Ju tätare rullningen är, desto mer stöd får du. Säkra ändan med en liten bit tejp.

Gör nu många tidningsrullar . En idealisk mängd skulle vara runt 48 men det kan räcka med färre.

Därefter ska du göra trianglar med dina tidningsrullar. Tejpa eller häfta ihop ändarna så att de bildar en triangel.  Skapa så många trianglar du kan med dina tidningsrullar.

Slutligen fäster du varje triangel vid varandra och skapar en struktur av den storlek du vill ha!

Storleken på din struktur beror på hur många trianglar du har gjort. Se bara till att du har tillräckligt många för taket som ger den slutliga stabiliteten åt ditt fort.  Du kan säkra ”fogarna” med några extra häftklamrar eller tejp för att se till att det inte rör sig för mycket.

Resten är upp till fantasin!

Konstruktionen bör till och med vara tillräckligt stabil för att kunna lägga en filt ovanpå!

Tipset är hämtat från: https://modernparentsmessykids.com/play/