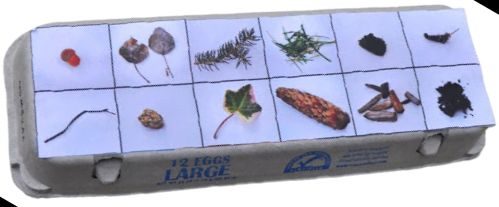
Väderstenar

Väderstenar

  • Klipp moln, sol och regndroppar från filt-tyg.
  • Limma dem på en tygpåse med textillim.
  • Måla olika vädersymboler på stenar och lägg dem i påsen.
  • Låt barnen plocka en sten från påsen och komma med en berättelse från bilden på stenen; om exempelvis en solig dag eller ett snöfall. Hur är vädret? Vad sätts på? Finns det några djur ute?

Tack lekolar.fi för tipset.

Make Your Own Kite

Materials to Make a Simple Paper Kite:

  • Printer paper
  • Scissors
  • Yarn (This worked ok with me, but I wish I used a lighter string.)
  • Tape
  • Popsicle Stick
  • Markers
  • Hole Puncher
  • Stapler
  • Ruler


Directions to Make a Simple Paper Kite: 


  1. Draw a design on both sides of your paper.  (Chuck and I did this collaboratively.)

    2.  Fold your paper in half. (Half the length.)

    3.  Using your ruler, make a mark at 2 1/2 ” and a mark at  3 1/2″ on the folded edge.

    4.  Now curve both corners of your paper down and staple them at the 2 1/2″ mark. (Don’t fold them down, make sure the paper is curved.) Your kite should now look like this.

  1. Punch at hole at the 3 1/2″ mark.  Then, cut a long piece of string and tie it to your kite.

    6.  Tape the other end of your string down to a popsicle stick.  Wind your excess string around the Popsicle stick so it doesn’t get tangled.

Now  go fly your own kite!    It takes a strong gust of wind to lift your kite, but if you run around (or ride your bicycle really fast), your kite will float along beside you too.

Gör en egen pappersdrake

Material:

  • Skrivpapper
  • Sax
  • Garn (Detta fungerade bra för mig, men jag önskar att jag hade använt ett lättare snöre.)
  • Tejp
  • Glasspinne
  • Tuschpennor
  • Hålslag
  • Häftapparat
  • Linjal

Instruktioner

  1. Rita ett mönster på båda sidor av pappret.
  2. Vik pappret på mitten. (Halva längden.)
  3. Med hjälp av din linjal gör du ett märke vid 6,5 cm och ett märke vid 9 cm på den vikta kanten.
  4. Böj nu båda hörnen på ditt papper nedåt och häfta ihop dem vid 6,5 cm märket. (Vik inte ner dem, se till att pappret är böjt.) Din drake ska nu se ut så här.

  1. Stansa ett hål vid 9 cm markeringen. Klipp sedan en lång bit snöre och knyt den till din drake.
  2. Tejpa fast den andra änden av ditt snöre på en glasspinne. Linda ditt överflödiga snöre runt glasspinnen så att det inte trasslar ihop sig.

Nu kan du gå ut och flyga med din egengjorda drake!    Det krävs en kraftig vindpust för att lyfta din drake, men om du springer runt (eller cyklar riktigt fort) kommer din drake också att flyta bredvid dig.

Build your own balance scale

Explore together concepts such as heavy and light, or heavier and lighter, using (unused) face masks.
Ok. You’ll need a clothes hanger too. And the face masks can be replaced with two equal-sized cans with handles if you want.
Hang one face mask on each end of the hanger. Be careful that they hang the same distance from the middle to get an accurate scale.
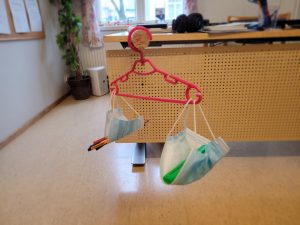
Then you can start compare different things. You can start by letting the children feel each hand and guess which one is heavier. First perhaps with things that have a little more difference, a raisin and an apple then you can try things closer together.
For a bigger challenge, swap the clothes hanger for a stick and work together to get the empty scale balanced first.

Bygg din egen balansvåg

Undersök tillsammans begrepp som tung och lätt, eller tyngre och lättare med hjälp av (oanvända) munskydd.

Ok. Du behöver en klädhängare också. Och munskydden går att byta ut mot två lika stora burkar med handtag om man så vill.

Häng ett munskydd i vardera änden på klädhängaren. Var noggrann att de hänger på samma avstånd från mitten för att få en rättvisande våg.

Sedan kan du jämföra olika saker. Börja gärna med att låta barnen känna i vardera handen och gissa vilken som är tyngst. Först kanske med saker som har lite större skillnad, ett russin och ett äpple sedan kan man pröva saker närmre varandra.

För en större utmaning, byt ut klädhängaren mot en pinne och arbeta tillsammans med att få den tomma vågen i jämnvikt först.


Grow Your Socks

What you’ll need

  • old pair of cotton socks
  • plastic bags
  • water
  • tape

What to do

Instead of putting seeds into the bag, running around in socks is how they’ll collect the seeds – directly from nature. Depending on your location and where you want to do your “collecting,” you can decide whether to let the kids just wear socks or whether you want to put the socks over their shoes. If you’re just running around your yard or neighborhood, I suggest the former. If you want to take a long hike, I’d suggest the latter. Both are pretty fun for kids!

Start by having the kids put on a pair of old socks (on their feet or over shoes). Next, since you want the seeds to stick, get the socks wet. Have the kids step in a bucket of water or just spray their feet with the hose. Once their socks are wet, set the kids loose!

Encourage them to explore wooded areas, under trees and bushes and other low traffic areas. Make sure they squish their feet into the ground to pick up as many seeds as possible. Step on dandelions, shuffle through fallen leaves, walk gently through the garden. Finally, have them find a muddy area to squish their feet in! This will pick up a bit of dirt to help the seeds grow.

When the socks are nice and filthy, take them off and place each one in a plastic bag. Tape the plastic bag to a window that gets a good amount of daily sunlight. If the socks feel dry, add a small amount of water. Now all you have to do is wait!

When they’ll sprout

Within a few days, you should notice some sprouting. By two weeks, your socks should have some serious blooms.

If at first you don’t succeed, try it again.

Grow your socks

Growing your socks is such a fun and easy science project for kids. It teaches them all about germination and what plants need to grow. You can experiment by growing socks from various locations to see the differences in the types of plants you get. If you want to go a step further, try identifying the sprouts you’re growing and figure out what each plant will look like when fully grown.