Hur tom är en tom flaska?

Introduktion

Visste du att flygplan och ljud har något gemensamt? Kan du gissa vad det kan vara? Lufttryck! Det är fascinerande hur luft – något som är så flytande och osynligt – kan ge upphov till ett otroligt antal fascinerande fenomen. I den här aktiviteten kommer du att använda din egen andedräkt för att blåsa in en liten pappersboll i en tom flaska. Det låter enkelt, men är det det? Prova det och se själv!

Material

  • En bit skrivarpapper på fyra gånger fyra tum.
  • Plastflaska med vid mynning, ungefär 500-800 ml (om du behöver använda flaskor med vanlig öppning, använd en pappersbit på två gånger fyra tum för att skapa bollen).
  • Bord eller annan plan yta
  • Hjälpare
  • Valfritt: Små bollar
  • Valfritt: Andra flaskor eller burkar
  • Valfritt: Sugrör

Förberedelser

  1. Skrynkla ihop pappersbiten på fyra gånger fyra tum till en tät boll. Bollen ska lätt passera genom flaskans öppning.

Förfarande

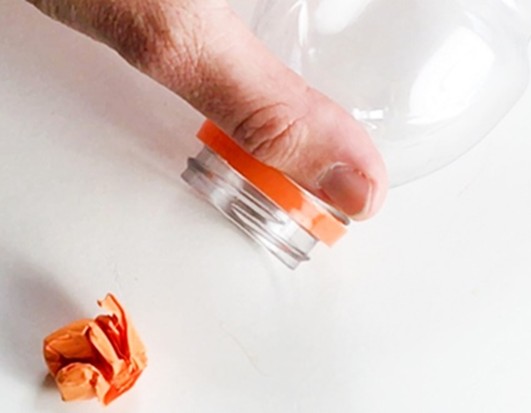
  1. Lägg flaskan på sidan med mynningen vänd mot dig. Be en medhjälpare att hålla ner munnen så att den rör vid arbetsytan.
  2. Placera pappersbollen framför flaskans mynning, cirka 5 centimeter från flaskan.
  3. Om en stund kommer du att blåsa in bollen i flaskan. Hur utmanande förväntar du dig att detta ska vara?
  4. Prova på det! Är det som du förväntade dig?
  5. Byt plats med din medhjälpare. Kan de blåsa bollen i flaskan?
  6. Brainstorma idéer som kan göra det lättare att blåsa bollen i flaskan. Prova de som låter mest lovande.
  7. Om några fungerar, vad tror du gör att dessa lösningar är effektiva medan andra misslyckas?
  8. Att titta på en liknande situation kan hjälpa till att förklara varför det är förvånansvärt svårt att blåsa in en pappersboll i en bot-tel. Försök att rulla eller flacka in bollen i flaskan.
  9. Är det svårt? Vad är annorlunda när du rullar eller vickar en boll jämfört med när du blåser en boll?
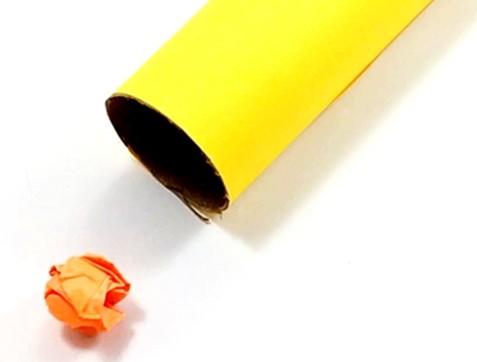
  10. Lägg pappröret med en öppning mot dig. Placera pappersbollen cirka 5 cm framför rörets öppning.
  11. Hur utmanande tror du att det kommer att vara att blåsa in bollen i röret?
  12. Prova dig fram.
  13. Är det som du förväntade dig?
  14. Jämför röret med flaskan.

Vad är annorlunda och vad är likadant? Vilken skillnad kan göra det svårare att blåsa bollen i flaskan? Kan du hitta sätt att testa din förklaring?

Vad hände?

Det var förmodligen nästan omöjligt att blåsa in bollen i flaskan utan att använda ett verktyg – men lätt att blåsa in den i röret eller rulla in den i flaskan.

Även om flaskan och röret verkar tomma är båda fyllda med luft. Luften i röret kan fritt strömma ut i rörets båda ändar, medan luften i flaskan bara kan lämna flaskan genom dess mynning.

När du blåser skapar du en luftström, och luftrörelsen kan ta med sig en lätt boll. När du blåser mot röret trycker luften framför röret ut den luft som redan finns i röret i andra änden. Bollen följer luftströmmen och kommer in i röret. När du blåser mot flaskans mynning är det som om luften du blåser och bollen som följer detta luftflöde studsar mot den luft som redan finns inuti flaskan – eftersom den inre luften inte har någonstans att ta vägen. Bollen kommer inte in i flaskan.

Du kan också använda Bernoullis observation för att förklara varför det faktum att du blåser bollen inte trycker in bollen i flaskan. Luften inuti flaskan rör sig långsamt, så den har ett högre tryck jämfört med den snabbt rörliga luften framför flaskan (luften du just blåste). Eftersom luft alltid försöker nå jämvikt kommer luften från flaskan (högtrycksregionen) att strömma ut ur flaskan mot lågtrycksregionen och ta med sig bollen.

När du rullar in bollen i flaskan kan luften samtidigt röra sig ut ur flaskan genom flaskmynningen medan bollen rullar in. För att lyckas blåsa in bollen i flaskan måste du koncentrera luften du blåser på bollen – i stället för att låta luften gå runt den. Ett sugrör kan hjälpa dig att göra det.


How Empty Is an Empty Bottle?

Introduction

Did you know that airplanes and sound have something in common? Can you guess what it might be? Air pressure! It is fascinating how air—something that is so fluid and invisible—can power an amazing number of fascinating phenomena. In this activity you will use your own breath to blow a small paper ball into an empty bottle. It sounds simple, but is it? Try it out and see for yourself!

Materials

  • A four-by-four-inch piece of printer paper
  • Plastic wide-mouth bottle, roughly 500 to 800 mL (If you need to use bottles with a regular opening, use a two-by-four-inch piece of paper to create the ball .)
  • Table or other flat surface
  • Helper
  • Optional: Small balls
  • Optional: Other bottles or jars
  • Optional: Drinking straw


Prep Work

  • Crumple the four-by-four-inch piece of paper into a tight ball. The ball should easily pass through the opening of the bottle.

Procedure

  1. Lay the bottle on its side with its mouth facing you. Ask a helper to hold the mouth down so it touches the work surface.
  2. Place the paper ball in front of the bottle’s mouth, about 5 centimeters away from the bottle.
  3. In a moment you will blow the ball into the bottle. How challenging do you expect this to be?
  4. Try it out! Is it as you expected?
  5. Switch places with your helper. Can they blow the ball in the bottle?
  6. Brainstorm ideas that can make blowing the ball in the bottle easier. Try out the ones that sound most promising.
  7. If some work, what do you think makes these solutions effective whereas others fail?
  8. Looking at a similar situation might help explain why it is surprisingly hard to blow a paper ball into a bottle. Try rolling or flicking the ball into the bottle.
  9. Is that difficult? What is different when you roll or flick a ball compared with when you blow a ball?
  10. Lay the cardboard tube with an opening facing you. Place the paper ball about 5 cm in front of the tube’s opening.
  11. How challenging do you expect blowing the ball into the tube will be?
  12. Try it out.
  13. Is it as you expected?
  14. Compare the tube with the bottle. 

What is different and what is similar? What difference could make it more difficult to blow the ball in the bottle? Can you find ways to test your explanation?

What Happened?

It was probably almost impossible to blow the ball into the bottle without using a tool—but easy to blow it into the tube or roll it into the bottle.

Although the bottle and the tube seem empty, both are filled with air. The air in the tube can freely flow out at both ends of the tube, whereas the air in the bottle can only leave through its mouth.

When you blow you create a current of air, and the movement of air can take a light ball with it. When you blow toward the tube the air in front of the tube pushes the air that is already in the tube out on the other end. The ball follows the flow of air and enters the tube. When you blow toward the mouth of a bottle it is as if the air you blow and the ball following this flow of air bounce off the air that is already inside the bottle—because that inside air has nowhere to go. The ball does not enter the bottle.

You can also use Bernoulli’s observation to explain why blowing the ball does not push the ball into the bottle. The air inside the bottle is moving slowly, so it is at a higher pressure compared with the fast-moving air in front of the bottle (the air you just blew). Because air always tries to reach equilibrium the air from the bottle (the high-pressure region) will flow out of the bottle toward the low-pressure region and take the ball with it.

When you roll the ball into the bottle air can simultaneously move out of the bottle through the bottle mouth while the ball is rolling in. In order to successfully blow the ball into the bottle, you need to concentrate the air you blow onto the ball—instead of letting the air go around it. A drinking straw can help you do that.

Symmetri

Gör spegelbilder med Lego

Material

  • Lego basplatta x 2
  • Lego bitar

Tillvägagångssätt

Ta basplattan och beräkna var mittpunkten är. Bygg en skiljelinje vid mittpunkten i en färg.

Gör ett mönster med olika bitar på ena sidan av brädan. När du fäster klossen i bottenplattan flyttar du en liknande bit till en hög på andra sidan. När du är klar med mönstret, kontrollera att du har placerat samma bitar som du använde för att göra mönstret.

Ge den halvfyllda bottenplattan till din partner. Byt också de lösa blocken med ditt par. Se vilket mönster paret har gjort på den andra sidan av plattan. Gör ett liknande mönster som ett spel på andra sidan mittlinjen med hjälp av de bitar du har fått.

Utmaning:

  • Gör ett halvmönster utan mittlinje tillsammans med en partner.
  • Titta på din omgivning och se vad du hittar som är symmetriskt.

Symmetry

Make mirrored images with Lego

Supplies

  • Lego baseplate x 2
  • Lego Pieces

Procedure

Take the baseplate and calculate where the center point is. Build a dividing line at the midpoint with a single color.

Make a pattern with different pieces on one side of the board. When you attach the brick to the baseplate, move a similar piece to a pile on the other side. Once you are done with the pattern, check that you have placed the same pieces that you used to make the pattern.

Give the half-filled base plate to your partner. Also, swap the loose blocks with your pair. See what pattern the couple has made on the other side of the plate. Make a similar pattern to a game on the other side of the center line using the pieces you’ve been given.

Challenge

  • Make a half-pattern without a midline with a partner.
  • Look at your surroundings and see what you find that is symmetrical.