Dagens tips kommer från STEAMPoweredFamily.com:
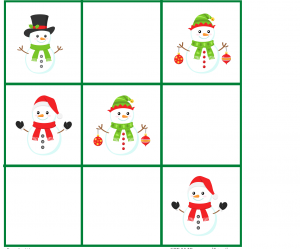
Allt du behöver finns i det här dokumentet: Jul Sudoku (PDF, 273 KB)
Mötespunkt för pedagoger att dela naturvetenskapliga idéer

Dagens tips kommer från STEAMPoweredFamily.com:
Allt du behöver finns i det här dokumentet: Jul Sudoku (PDF, 273 KB)
Try to decide how to paint a bathroom wall using dice.
Starting with the first square, roll a dice to colour according to the table at the bottom of the page.
Continue in this way until all squares are coloured.
Compare each other’s results when you are finished.
From this you can think about probability.
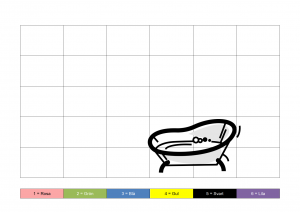
To print: Måla badrummet med tärningar (PDF, 49kB)
Pröva på att bestämma hur en badrumsvägg ska färgläggas med hjälp av tärningar.
Börja med första rutan, slå en tärning färga enligt tabellen längst ner på sidan.
Fortsätt på det viset tills alla rutor är färglagda.
Jämför varandras resultat när man är klara.
Utifrån det här kan man fundera på sannolikhet.
För att skriva ut: Måla badrummet med tärningar (PDF, 49kB)
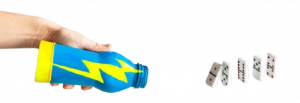
WHAT IS AN AIR VORTEX CANNON?
You generally can’t see an air vortex unless there’s a good deal of particles in the air such as smoke. However, you can see the effects of it by making this fun air cannon! An air vortex cannon releases doughnut-shaped air vortices — similar to smoke rings but larger, stronger and invisible. The vortices are able to ruffle hair, disturb papers or blow out candles after travelling a short distance.
YOU WILL NEED:
HOW TO MAKE AN AIR CANNON
STEP 1: First, you want to cut off the ends of the bottle and balloon.


STEP 2: Decorate the bottle if desired! This step can be done before or after the next step depending on what you want to do to it.
STEP 3: Then you will want to stretch the balloon over the end of the bottle.

Done! You’ve made a super simple awesome air vortex cannon to blast out air.
HOW TO USE YOUR AIR CANNON
By using the end of the bottle with the balloon, to essentially suck air back, you can then aim and shoot that air out the front of the bottle. You can even knock over dominoes with that force of air! Amazing! Simply stretch out the end of the balloon and let it go.
What can you knock over with your own air vortex cannon? You can try making paper targets, setting up paper towel tubes, cups, and more! Ready aim fire!
HOW DOES AN AIR CANNON WORK?
This air vortex cannon may be super simple to make but it also includes some great science to learn too! If you really want to keep kiddos engaged with science, make it fun and hands-on!
As mentioned earlier, we can’t see air but we can see the effects of air moving through trees, the beach ball being blown across the lawn and even the empty trash can as it blows out of the driveway and down the street. You can also feel air when it’s windy! Air is made up of molecules (oxygen, nitrogen, and carbon dioxide) even if you can’t see them though on a windy day, you can sure feel them!
Why does the air move? Generally, it’s because of air pressure caused by temperature changes and moves from high pressure to low pressure. This is when we see storms pop up, but we can also see it on an ordinary day too with a soft breeze.
Although the temperature is a big part of the pressure change, you can also make that pressure change yourself with this cool air cannon project! The air blaster creates a burst of air that shoots out of the hole. Although you can’t see it, the air actually forms a donut shape. The difference in air pressure from the fast-moving air through the opening creates the spinning vortex that is stable enough to travel through the air and knock over a domino!
VAD ÄR EN LUFTKANON?
I allmänhet kan du inte se en luftvirvel om det inte finns en hel del partiklar i luften, t.ex. rök. Du kan dock se effekterna av den genom att göra den här roliga luftkanonen! En luftkanon släpper ut munkformade luftvirvlar – liknande rökringar men större, starkare och osynliga. Virvlarna kan rufsa håret, störa papper eller blåsa ut ljus efter att ha färdats en kort sträcka.
DU BEHÖVER:
SÅ HÄR GÖR DU
STEG 1: Först klipper du av ändarna på flaskan och ballongen.
STEG 2: Dekorera flaskan om du vill! Detta steg kan göras före eller efter nästa steg beroende på vad du vill göra med den.
STEG 3: Sedan ska du sträcka ut ballongen över flaskans ände.
Klart! Du har gjort en superenkel fantastisk luftvirvelkanon för att blåsa ut luft.
HUR DU ANVÄNDER DIN LUFTKANON
Genom att använda flaskans ände med ballongen, för att i huvudsak suga tillbaka luft, kan du sedan sikta och skjuta ut luften framifrån flaskan. Du kan till och med slå omkull dominobrickor med denna luftkraft! Fantastiskt! Det är bara att sträcka ut ballongens ände och släppa loss den.
Vad kan du slå omkull med din egen luftvirvelkanon? Du kan prova att göra måltavlor av papper, sätta upp toapappersrullar, muggar och mycket mer!
HUR FUNGERAR EN LUFTKANON?
Den här luftvirvelkanonen må vara superenkel att göra, men den innehåller också en del bra vetenskap att lära sig! Om du verkligen vill hålla barnen engagerade i vetenskap, gör det roligt och praktiskt!
Som tidigare nämnts kan vi inte se luft, men vi kan se effekterna av luft som rör sig genom träd, strandbollen som blåser över gräsmattan och till och med den tomma soptunnan när den blåser ut från uppfarten och nerför gatan. Man kan också känna luft när det blåser! Luft består av molekyler (syre, kväve och koldioxid) och även om du inte kan se dem när det blåser kan du känna dem!
Varför rör sig luften? I allmänhet beror det på lufttrycket som orsakas av temperaturförändringar och rör sig från högt tryck till lågt tryck. Det är då vi ser stormar dyka upp, men vi kan också se det på en vanlig dag också med en svag bris.
Även om temperaturen är en stor del av tryckförändringen kan du också själv åstadkomma tryckförändringen med det här häftiga luftkanonprojektet! Luftkanonen skapar en luftstöt som skjuter ut ur hålet. Även om du inte kan se det bildar luften faktiskt en munkform. Skillnaden i lufttryck från den snabbt rörliga luften genom öppningen skapar den snurrande virveln som är tillräckligt stabil för att färdas genom luften och slå omkull en domino!
Thanks lekolar.se for the idea!
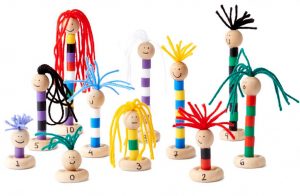
Glöm inte att göra två femmor så att du kan visa barnen att tvillingarna fem tillsammans blir tio.
Tack lekolar.se för tipset!
If you like dot-to-dot exercises have I collected some here. Even one dinosaur themed.
Om ni gillar uppgifter där man ska fylla i från punkt till punkt har jag sammanställt några här. Från 1 till upp mot 20.
Hittade till och med en med dinosaurie-tema.
A simple experiment on how the colour from M&Ms mixes in water. Simple, fast, cheap and beautiful makes it an interesting experiment. Get the kids to think first what they think will happen. Questions are an important part of the scientific method, along with observation and investigation.
The science behind why the colors do not mix is known as water stratification. Each color of M&Mhas a slightly different chemical make up which, when dissolved, creates a water solution that has slightly different properties such as density, salinity, and oxygenation. This creates a barrier that prevents the water from mixing and is why salt water and fresh water do not mix.
Another scientific property that is at work here is called concentration gradient. Simply put this is the process where molecules will move from high concentration to lower concentration areas. We see this as the colors move through the water.
Consider what you want your art to look like and start arranging your Skittles in a pattern around the plate that you think will work best for your Skittles colorful art creation.
Gently pour the water onto the plate.
Very quickly you will start to see the colors travel. Watch to see how they move about the plate and what happens when they meet up with other colors. Depending on the size of your creation this will take about 10 minutes.
Our favorite part of this experiment was creating a variety of different art pieces.
One way to analyze it is to create a timelapse movie. Set up your iPad to take a picture at a set interval and then combine it to a movie. For my movies did I use iMotion.
Two inspirational movies: Film 1 and Film 2