
Materials
- Two pieces of paper
- Scissors
- Pencil
- Drinking straw
- Ruler
- Clear space in which to launch your “rockets,” such as a large room, hallway or outdoor area with no wind
- Measuring tape (optional)
Procedure
- Cut one piece of paper into four smaller rectangles, by cutting it in half lengthwise and widthwise. This will allow you to make four rockets.
- Wrap one of the paper rectangles around a pencil to form a cylinder, with the long edge of the paper along the length of the pencil.
- Tape the cylinder closed so it does not unravel (but do not tape it to the pencil).
- Slide the cylinder off the pencil. Pinch one end of the cylinder shut and seal it with tape. (This is the “front” end of your rocket.) Leave the other end open. This will be your first rocket, with no fins.
- With plenty of room in front of you—and no obstructions, such as furniture or people—prepare to launch your first rocket! Slide it over a drinking straw. Aim the straw forward, then blow into it as hard as you can. Watch your rocket as it flies.
How far does it go? Does it fly straight or does it tumble in midair? - Launch your rocket a few more times to see if it flies the same way. If you would like to record your rocket flight distances, be sure to launch it from the same place each time, and measure to the landing spot with a tape measure.
- Make another paper rocket following the previous steps. Remember to pinch one end and tape it shut.
- For this rocket, however, you will make fins. Cut out two right triangles (with a 90-degree angle in one corner) from the other piece of paper. The long sides of the triangles should be about eight centimeters. You will fold each triangle to make two fins, so you will have four fins total.

- Draw a line that splits one triangle in half (from the 90-degree corner to the middle of the long side of the triangle).
- Draw two lines parallel to the first line (one on each side), about five millimeters away from it.
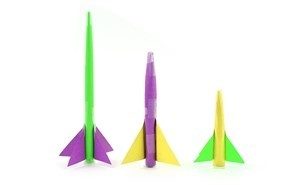
- Now, fold the triangle up along these two lines. The result should be two triangles sticking up in the air (the fins), with a flat part connecting them in between.
- Tape the flat part to the side of your cylinder, toward the open end (the base, or bottom, of your rocket).
- Repeat these steps for the other triangle, and tape it to your cylinder on the opposite side of the first one. The result should be four fins that form a “+” shape when you look at the rocket from either end. If necessary, bend the fins so they are spaced out 90 degrees apart from one another.
- Slide the new rocket onto the drinking straw and launch it.
How far does this rocket go? How does its flight compare with your first finless rocket? Does it go farther? Does it tumble or does it fly straight? Do you think fins help the stability of your rocket? - Launch it a few more times. If you are measuring the flight distance of each rocket, use a tape measure and record how far it flew.
What Happened?
You should have seen that your finless rocket flew straight at first but quickly spiraled out of control. It might have tumbled through the air and fluttered to the ground, almost like a leaf falling from a tree. This is because the rocket did not have fins to keep it stable. If it started turning just a little bit, then it would start turning even more rapidly until it completely lost control. In contrast, your second rocket that had fins should have flown straight, and traveled much farther as a result. This is because the fins help keep the rocket stable, or pointed in the same direction. If the rocket turns a little bit, the fins help turn it back in the original direction.