Några olika idéer på matematik utomhus, hur många barn runt ett träd, hur snabb är en backe… ?
Utematte (PDF, 495 kB)
Mötespunkt för pedagoger att dela naturvetenskapliga idéer

Några olika idéer på matematik utomhus, hur många barn runt ett träd, hur snabb är en backe… ?
Utematte (PDF, 495 kB)
Some various ideas on what to meassure outdoor; how many children around a tree, how fast is a hill… ?
Outdoor mathematics (PDF, 453 kB)
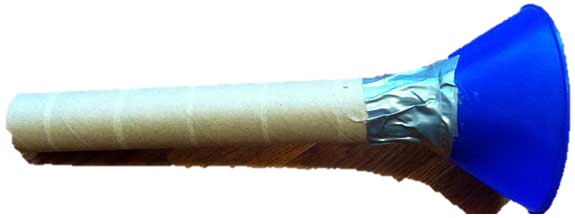
Har du någonsin undrat vad som händer med hjärtat när vi tränar intensivt? Hur förändras dess slag? En läkare kan ta reda på detta med hjälp av ett verktyg som kallas stetoskop, vilket är ett långt, tunt plaströr som har en liten skiva i ena änden och öronstycken i den andra änden. I den här aktiviteten ska du göra ett hemmagjort stetoskop och använda det för att mäta människors hjärtfrekvens i vila och efter träning.
När människor tränar behöver deras kroppar mer syre, och därför slår deras hjärtan snabbare och hjärtfrekvensen ökar. Det är därför du troligen fann att när din frivilliga person tränade ökade hjärtfrekvensen jämfört med vilopulsen. Dessutom påverkar genetik, kön, ålder och hälsa människors hjärtfrekvens. Hjärtfrekvensen hos personer som tränar regelbundet ökar vanligtvis inte lika mycket under träning. Regelbunden motion stärker hjärtat så att det inte behöver arbeta lika hårt för att utföra samma mängd motion.
Medan du kan bestämma någons vilopuls genom att räkna antalet slag på 15 sekunder och multiplicera med fyra för att få fram slag per minut (bpm), är det bättre att för att beräkna hjärtfrekvensen omedelbart efter träning räkna antalet slag på 10 sekunder och multiplicera det värdet med sex (för att få fram bpm). Eftersom hjärtat snabbt saktar ner efter träning bör hjärtfrekvensen mätas omedelbart efter att en person har slutat träna (eller medan han eller hon tränar, om möjligt).
Have you ever wondered what happens to the heart as we exercise intensely? How does its beating change? A doctor can figure this out by using a tool called a stethoscope, which is a long, thin plastic tube that has a small disc on one end and earpieces on the other end. In this activity, you will make a homemade stethoscope and use it to measure peoples’ heart rates at rest and after exercising.
When people exercise, their bodies need more oxygen, and consequently their hearts beat faster and their heart rates increase. This is why you most likely found that when your volunteer exercised, the heart rate increased compared to the resting heart rate. In addition, genetics, gender, age, and health all affect people’s heart rates. The heart rates in people who exercise regularly usually will not increase as much during exercise. Regular exercise strengthens the heart so that it does not need to work as hard to do the same amount of exercise.
While you can determine someone’s resting heart rate by counting the number of beats in 15 seconds and multiplying by four to get the beats per minute (bpm), to calculate a heart rate immediately after exercise it is better to count the number of beats for 10 seconds and multiply that value by six (to get the bpm). Because the heart will quickly slow down after exercise, the heart rate should be measured immediately after a person has stopped exercising (or while they exercise, if possible).
Har du någonsin undrat varför man använder salt för att avisa vägar? Visste du att snö lättare fastnar på vägbanor som har behandlats med salt? Varför skulle det vara så? I den här aktiviteten kommer du att använda samma principer för att lyfta iskuber med ett snöre. Är det möjligt att göra detta utan att få kalla händer? Prova aktiviteten och se vad en nypa salt kan göra!

Kunde du lyfta den isbit som du hade bestrött med salt och lämnat orörd i några minuter? Lyckades du inte lyfta upp iskuberna i alla andra fall? Varför händer detta? För det första smälter isen runt snöret när du strör salt över det. Sedan fryser snöret fast vid iskuberna.
När du strör salt över is löser det sig i det tunna vattenskiktet ovanför isen. Eftersom saltvatten fryser vid en lägre temperatur än rent vatten, får tillsatsen av salt en del is att smälta och absorbera värme i processen. Området runt omkring kyls därigenom och fryser vattenmolekyler till iskuberna, vilket också fryser snöret på kuben. Utan saltet håller vattnet och isen samma temperatur och snöret fryser inte fast på isen. I båda fallen smälter iskuberna gradvis när de absorberar värme från luften runt omkring, men utan salt kan snöret inte frysa fast på iskuberna.
Om du använde socker skulle du se samma effekt: kuben fastnar på snöret. Om man löser upp andra ämnen i vatten kan man också sänka fryspunkten och få samma effekt.
Have you ever wondered why salt is used to de-ice roads? Did you know that snow sticks more readily to pavement that has been treated with salt? Why would this be the case? In this activity, you will use the same principles to hoist ice cubes with a piece of string. Is it possible to do this without getting your hands cold? Try the activity and see what a pinch of salt can do!
Could you lift the ice cube you had sprinkled with salt and left untouched for a few minutes? Did you fail to pick up the cube in all other cases? Why does this happen? First, the ice around the string melts when you sprinkle it with salt. Then, the string freezes to the ice cube.
When you sprinkle salt over ice, it dissolves into the thin layer of water above the ice. Because salt water freezes at a lower temperature than pure water, adding the salt makes some ice melt and absorb heat in the process. The area around it thereby cools and freezes water molecules to the ice cube, also freezing the string onto the cube. Without the salt, the water and ice remain at the same temperature and the string does not freeze to the ice. In both cases, the ice cube gradually melts as it absorbs heat from the air around it, but without the salt, the string cannot freeze to the cube.
If you used sugar, you would see the same effect: the cube sticks to the string. Dissolving other substances in water will also lower the freezing point and create the same effect.
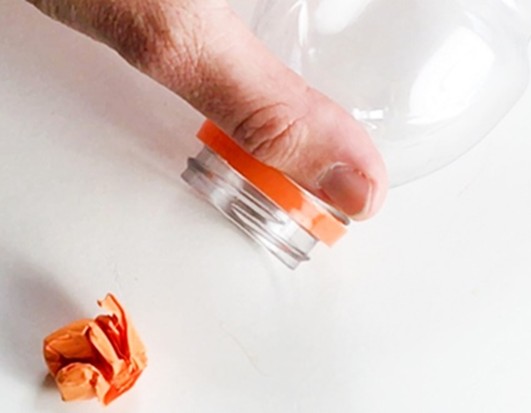
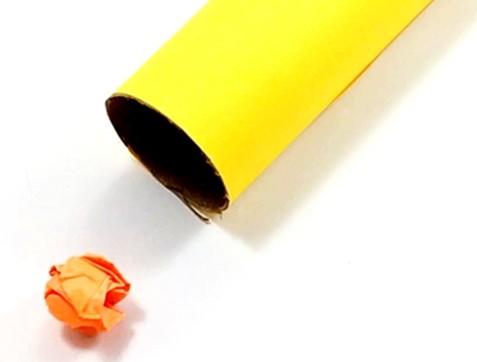
Visste du att flygplan och ljud har något gemensamt? Kan du gissa vad det kan vara? Lufttryck! Det är fascinerande hur luft – något som är så flytande och osynligt – kan ge upphov till ett otroligt antal fascinerande fenomen. I den här aktiviteten kommer du att använda din egen andedräkt för att blåsa in en liten pappersboll i en tom flaska. Det låter enkelt, men är det det? Prova det och se själv!

Vad är annorlunda och vad är likadant? Vilken skillnad kan göra det svårare att blåsa bollen i flaskan? Kan du hitta sätt att testa din förklaring?
Det var förmodligen nästan omöjligt att blåsa in bollen i flaskan utan att använda ett verktyg – men lätt att blåsa in den i röret eller rulla in den i flaskan.
Även om flaskan och röret verkar tomma är båda fyllda med luft. Luften i röret kan fritt strömma ut i rörets båda ändar, medan luften i flaskan bara kan lämna flaskan genom dess mynning.
När du blåser skapar du en luftström, och luftrörelsen kan ta med sig en lätt boll. När du blåser mot röret trycker luften framför röret ut den luft som redan finns i röret i andra änden. Bollen följer luftströmmen och kommer in i röret. När du blåser mot flaskans mynning är det som om luften du blåser och bollen som följer detta luftflöde studsar mot den luft som redan finns inuti flaskan – eftersom den inre luften inte har någonstans att ta vägen. Bollen kommer inte in i flaskan.
Du kan också använda Bernoullis observation för att förklara varför det faktum att du blåser bollen inte trycker in bollen i flaskan. Luften inuti flaskan rör sig långsamt, så den har ett högre tryck jämfört med den snabbt rörliga luften framför flaskan (luften du just blåste). Eftersom luft alltid försöker nå jämvikt kommer luften från flaskan (högtrycksregionen) att strömma ut ur flaskan mot lågtrycksregionen och ta med sig bollen.
När du rullar in bollen i flaskan kan luften samtidigt röra sig ut ur flaskan genom flaskmynningen medan bollen rullar in. För att lyckas blåsa in bollen i flaskan måste du koncentrera luften du blåser på bollen – i stället för att låta luften gå runt den. Ett sugrör kan hjälpa dig att göra det.

Did you know that airplanes and sound have something in common? Can you guess what it might be? Air pressure! It is fascinating how air—something that is so fluid and invisible—can power an amazing number of fascinating phenomena. In this activity you will use your own breath to blow a small paper ball into an empty bottle. It sounds simple, but is it? Try it out and see for yourself!
What is different and what is similar? What difference could make it more difficult to blow the ball in the bottle? Can you find ways to test your explanation?
It was probably almost impossible to blow the ball into the bottle without using a tool—but easy to blow it into the tube or roll it into the bottle.
Although the bottle and the tube seem empty, both are filled with air. The air in the tube can freely flow out at both ends of the tube, whereas the air in the bottle can only leave through its mouth.
When you blow you create a current of air, and the movement of air can take a light ball with it. When you blow toward the tube the air in front of the tube pushes the air that is already in the tube out on the other end. The ball follows the flow of air and enters the tube. When you blow toward the mouth of a bottle it is as if the air you blow and the ball following this flow of air bounce off the air that is already inside the bottle—because that inside air has nowhere to go. The ball does not enter the bottle.
You can also use Bernoulli’s observation to explain why blowing the ball does not push the ball into the bottle. The air inside the bottle is moving slowly, so it is at a higher pressure compared with the fast-moving air in front of the bottle (the air you just blew). Because air always tries to reach equilibrium the air from the bottle (the high-pressure region) will flow out of the bottle toward the low-pressure region and take the ball with it.
When you roll the ball into the bottle air can simultaneously move out of the bottle through the bottle mouth while the ball is rolling in. In order to successfully blow the ball into the bottle, you need to concentrate the air you blow onto the ball—instead of letting the air go around it. A drinking straw can help you do that.
Gör spegelbilder med Lego
Ta basplattan och beräkna var mittpunkten är. Bygg en skiljelinje vid mittpunkten i en färg.
Gör ett mönster med olika bitar på ena sidan av brädan. När du fäster klossen i bottenplattan flyttar du en liknande bit till en hög på andra sidan. När du är klar med mönstret, kontrollera att du har placerat samma bitar som du använde för att göra mönstret.

Ge den halvfyllda bottenplattan till din partner. Byt också de lösa blocken med ditt par. Se vilket mönster paret har gjort på den andra sidan av plattan. Gör ett liknande mönster som ett spel på andra sidan mittlinjen med hjälp av de bitar du har fått.
Make mirrored images with Lego
Take the baseplate and calculate where the center point is. Build a dividing line at the midpoint with a single color.
Make a pattern with different pieces on one side of the board. When you attach the brick to the baseplate, move a similar piece to a pile on the other side. Once you are done with the pattern, check that you have placed the same pieces that you used to make the pattern.
Give the half-filled base plate to your partner. Also, swap the loose blocks with your pair. See what pattern the couple has made on the other side of the plate. Make a similar pattern to a game on the other side of the center line using the pieces you’ve been given.