Building and measuring lengths
Steg 1 Material
- LEGO Pieces
- LEGO Wheels
- LEGO-axis parts
- Balloon
Phase 2 Activity
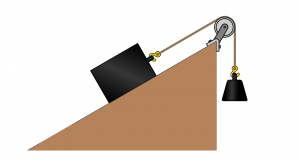
Build a car model. When building a car, consider where it is best for the balloon to be and how the weight of the Lego can balance as the car goes. When building the back of the car (where the balloon is attached), remember not to leave too much space around the mouth of the balloon, otherwise there is a risk that the balloon will fly off without a car.
Inflate the balloon and let your racer go.
If the racer didn’t succeed the first time, rebuild and try different models. When the drivers are ready, a measurement session can be held where each racer is put in turn to ride. The distance can be measured with a tape measure or with an iPad tape measure using the app.
Phase 3 Why
Engineers develop and solve problems.
How to build a car where the balloon stays. Try to get the car to move without giving it speed with your hand.
Idea taken from STEAM Turku