Some various ideas on what to meassure outdoor; how many children around a tree, how fast is a hill… ?
Outdoor mathematics (PDF, 453 kB)
Mötespunkt för pedagoger att dela naturvetenskapliga idéer

Some various ideas on what to meassure outdoor; how many children around a tree, how fast is a hill… ?
Outdoor mathematics (PDF, 453 kB)
Have you ever wondered what happens to the heart as we exercise intensely? How does its beating change? A doctor can figure this out by using a tool called a stethoscope, which is a long, thin plastic tube that has a small disc on one end and earpieces on the other end. In this activity, you will make a homemade stethoscope and use it to measure peoples’ heart rates at rest and after exercising.
When people exercise, their bodies need more oxygen, and consequently their hearts beat faster and their heart rates increase. This is why you most likely found that when your volunteer exercised, the heart rate increased compared to the resting heart rate. In addition, genetics, gender, age, and health all affect people’s heart rates. The heart rates in people who exercise regularly usually will not increase as much during exercise. Regular exercise strengthens the heart so that it does not need to work as hard to do the same amount of exercise.
While you can determine someone’s resting heart rate by counting the number of beats in 15 seconds and multiplying by four to get the beats per minute (bpm), to calculate a heart rate immediately after exercise it is better to count the number of beats for 10 seconds and multiply that value by six (to get the bpm). Because the heart will quickly slow down after exercise, the heart rate should be measured immediately after a person has stopped exercising (or while they exercise, if possible).
Have you ever wondered why salt is used to de-ice roads? Did you know that snow sticks more readily to pavement that has been treated with salt? Why would this be the case? In this activity, you will use the same principles to hoist ice cubes with a piece of string. Is it possible to do this without getting your hands cold? Try the activity and see what a pinch of salt can do!

Could you lift the ice cube you had sprinkled with salt and left untouched for a few minutes? Did you fail to pick up the cube in all other cases? Why does this happen? First, the ice around the string melts when you sprinkle it with salt. Then, the string freezes to the ice cube.
When you sprinkle salt over ice, it dissolves into the thin layer of water above the ice. Because salt water freezes at a lower temperature than pure water, adding the salt makes some ice melt and absorb heat in the process. The area around it thereby cools and freezes water molecules to the ice cube, also freezing the string onto the cube. Without the salt, the water and ice remain at the same temperature and the string does not freeze to the ice. In both cases, the ice cube gradually melts as it absorbs heat from the air around it, but without the salt, the string cannot freeze to the cube.
If you used sugar, you would see the same effect: the cube sticks to the string. Dissolving other substances in water will also lower the freezing point and create the same effect.
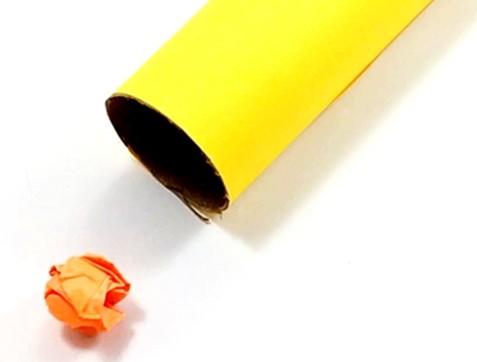
Did you know that airplanes and sound have something in common? Can you guess what it might be? Air pressure! It is fascinating how air—something that is so fluid and invisible—can power an amazing number of fascinating phenomena. In this activity you will use your own breath to blow a small paper ball into an empty bottle. It sounds simple, but is it? Try it out and see for yourself!

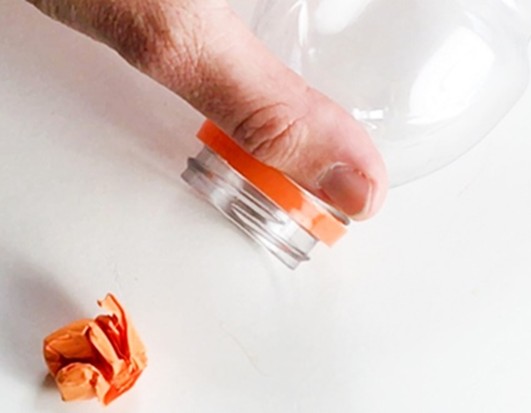
What is different and what is similar? What difference could make it more difficult to blow the ball in the bottle? Can you find ways to test your explanation?
It was probably almost impossible to blow the ball into the bottle without using a tool—but easy to blow it into the tube or roll it into the bottle.
Although the bottle and the tube seem empty, both are filled with air. The air in the tube can freely flow out at both ends of the tube, whereas the air in the bottle can only leave through its mouth.
When you blow you create a current of air, and the movement of air can take a light ball with it. When you blow toward the tube the air in front of the tube pushes the air that is already in the tube out on the other end. The ball follows the flow of air and enters the tube. When you blow toward the mouth of a bottle it is as if the air you blow and the ball following this flow of air bounce off the air that is already inside the bottle—because that inside air has nowhere to go. The ball does not enter the bottle.
You can also use Bernoulli’s observation to explain why blowing the ball does not push the ball into the bottle. The air inside the bottle is moving slowly, so it is at a higher pressure compared with the fast-moving air in front of the bottle (the air you just blew). Because air always tries to reach equilibrium the air from the bottle (the high-pressure region) will flow out of the bottle toward the low-pressure region and take the ball with it.
When you roll the ball into the bottle air can simultaneously move out of the bottle through the bottle mouth while the ball is rolling in. In order to successfully blow the ball into the bottle, you need to concentrate the air you blow onto the ball—instead of letting the air go around it. A drinking straw can help you do that.

Make mirrored images with Lego
Take the baseplate and calculate where the center point is. Build a dividing line at the midpoint with a single color.
Make a pattern with different pieces on one side of the board. When you attach the brick to the baseplate, move a similar piece to a pile on the other side. Once you are done with the pattern, check that you have placed the same pieces that you used to make the pattern.

Give the half-filled base plate to your partner. Also, swap the loose blocks with your pair. See what pattern the couple has made on the other side of the plate. Make a similar pattern to a game on the other side of the center line using the pieces you’ve been given.
Measuring can be done in more ways than in centimeter or inches.
Why not use something that the children are familiar with? The plusplus building blocks are easily formed into rulers that can be used in many ways.

If you want do I have a worksheet for measuring (PDF, 161 kB)
The idea is taken from the official site of plus-plus.com
Building a boat, raft, or other watercraft to safely transport items across water is a way for children to practice planning and decision-making skills. Gather your materials beforehand, and try the activity along with him!

Boost your tunes and learn some science! We’ll build a DIY phone speaker using common household items. This project is a fantastic way to learn about sound waves, amplification, and the basics of engineering design.
Prepare the Tube: Use a pair of scissors to cut a rectangular slit in the center of your paper towel tube. Use the bottom of your phone to trace the opening. This slit should be just large enough to hold your phone securely.

Prepare the Cups: Cut small circular holes in the sides of each cup, big enough for the ends of the tube to fit inside. Trace the end of the cardboard tube on the lower side of each cup to get the right fit. The cups will act as sound amplifiers.

Assemble the Speaker: Insert one end of the tube into the hole in the first cup and the other end into the second cup. Ensure a snug fit, and if needed, use masking or washi tape to secure the tube to the cups.

Test the Sound: Place the base of your phone in the slot on the tube, play some music, and listen! You should notice a significant increase in volume and clarity.

Sound is created when something vibrates. These vibrations move through the air as waves. Think of a wave in the ocean moving up and down — like how sound waves travel, except they move through the air, not water.
When you play music on your smartphone, the speaker creates tiny vibrations that travel through the air in all directions. These sound waves are quite small and spread out quickly, which makes the sound seem quieter.
In this DIY speaker project, we focus on the sound waves by channeling them through paper towel tubes and cups. The tube helps guide the sound waves in one direction instead of letting them spread out. Then, the cups act like amplifiers by bouncing the sound waves inside, making them stronger. As the sound waves bounce and exit the cup, they come out more powerfully, which makes the music sound louder to our ears.
When you listen through your DIY speaker, you hear the sound waves more focused and amplified. This shows how engineers use materials and design to control sound and make it louder or clearer. This kind of science can be found in real speakers, headphones, and even large concert sound systems!
Idea taken from the blog LittleBinsforLittleHands
Use dino toys to make fun process art. Use different size dinos, different types, and even different body parts. Let the dinosaurs be your paintbrush.

You can of course use other types of animals. And gladly take the opportunity to scavenge for prints left in the nature around.
The idea has come from the LittleBinsForLittleHands blog
Sudoku boards: Lego-sudoku Eng (PDF, 117 kB)